As your game grows, so does the complexity of its logic.
Enemies need to react to the player. Animations need to trigger damage. AI systems need to coordinate state changes. UI needs to update
when something happens — but that “something” might come from anywhere.
One approach is direct calls:
ts
enemy.takeDamage(10);
enemy.die();
hud.updateHealth();
sound.play();
ts
enemy.takeDamage(10);
enemy.die();
hud.updateHealth();
sound.play();
This works… until it doesn’t.
Suddenly everything knows about everything else. A small change in one system ripples through your entire codebase. Reuse becomes
difficult. Debugging becomes painful.
This is where event-driven architecture shines — and ExcaliburJS provides a powerful, flexible event system that can be used as a tool to connect different systems.
In this article, we’ll explore:
What Excalibur’s event framework actually gives you
Why publish/subscribe (pub/sub) patterns matter in games
Practical, real-world use cases
And how to model gameplay events, not just callbacks
Events are a tool. Any tool can help you solve a specific set of problems. As with any other tool, if you start applying this solution
to the wrong problems, there are potential foot-guns. We will discuss this a bit.
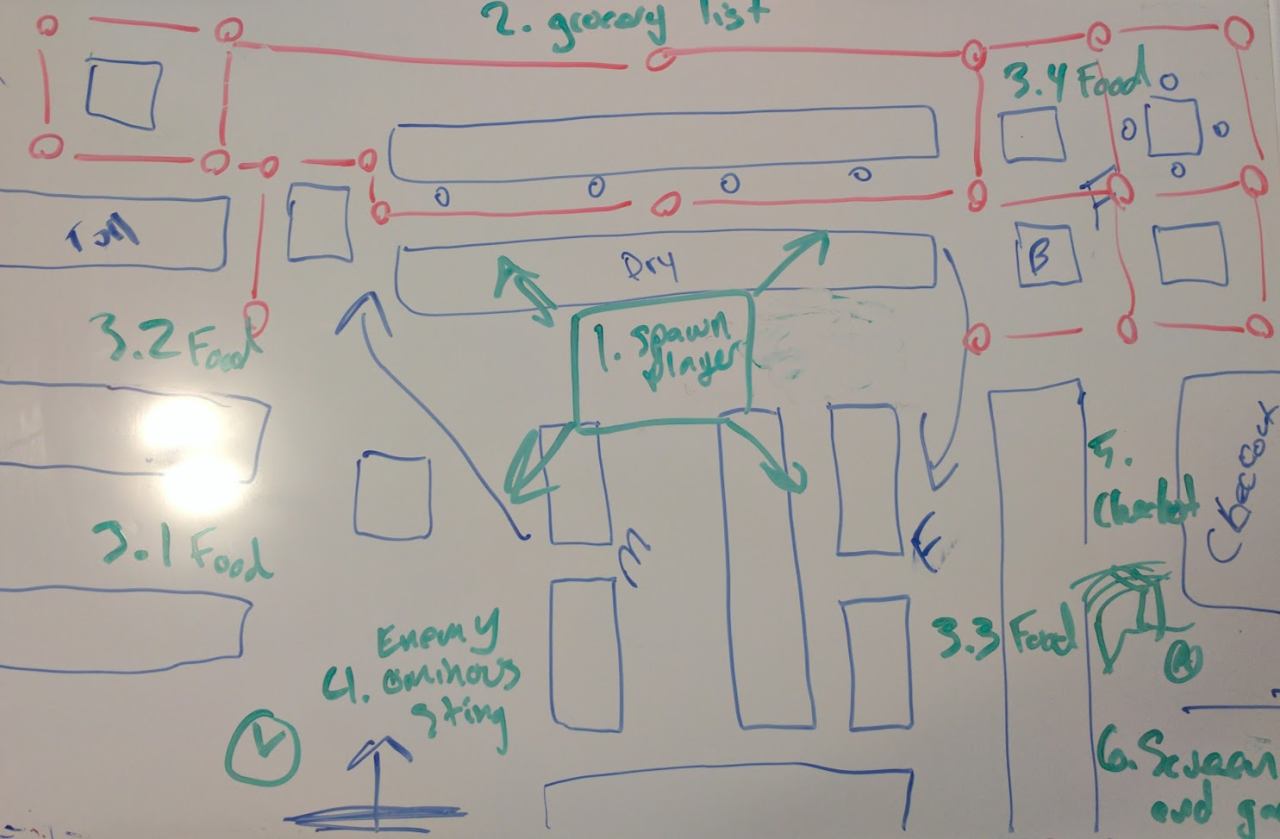
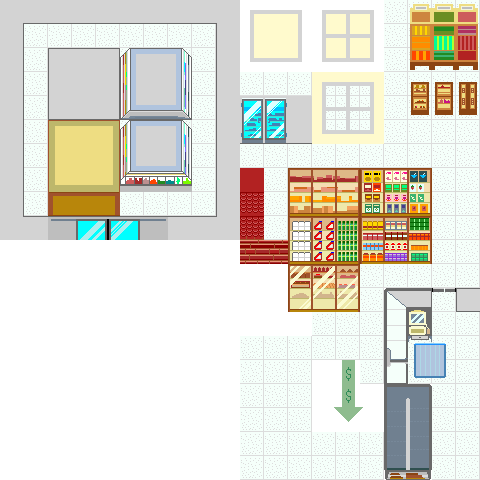
Every 2D gamedev knows the pain: you've got a beautiful tilemap, but now you need to add gameplay elements. Where do enemies spawn? Which tiles are collectibles? What triggers that secret door?
The traditional solution? Maintain separate data structures, coordinate systems, and hope they stay in sync with your map. It's tedious, error-prone, and breaks the moment you resize your level.
In this post, I'll show you how the SpriteFusion tile attributes feature changes the game. With the updated ExcaliburJS SpriteFusion plugin, you can now embed custom JSON data directly into your tilemap — keeping your logic and layout in perfect harmony.
Small plug for the engine that makes this all possible:
ExcaliburJS is a friendly, TypeScript 2D game engine for the web. It's free and open source (FOSS), well documented, and has a growing community of developers building great games.
The SpriteFusion plugin is just one example of how Excalibur's architecture makes complex features feel natural. If you're interested in 2D web game development, check it out!
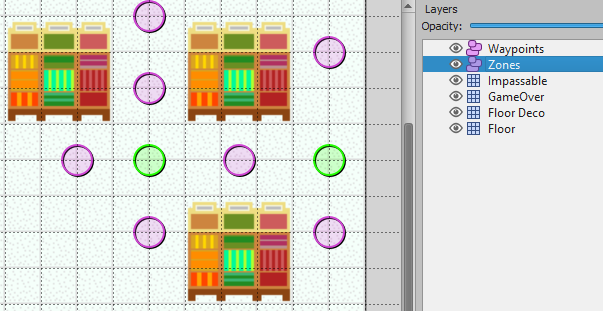
Tile attributes bridge the gap between level design and game logic. What used to require maintaining parallel data structures now happens automatically:
Design once — add entities, triggers, and logic directly in SpriteFusion
One source of truth — no more coordinate synchronization
Iterate fast — move things in the editor, not the code
The updated ExcaliburJS SpriteFusion plugin makes this seamless with attribute callbacks and object layers. Your maps become more than just visuals — they're living configuration files for your game world.
Whether you're spawning enemies, placing collectibles, or defining trigger zones, tile attributes keep your workflow smooth and your codebase clean.
Ready to embed game logic in your tilemaps? Give SpriteFusion attributes a try — your future self will thank you when you move that boss fight for the tenth time and everything just works.
Autotiling is one of those topics every 2D gamedev bumps into sooner or later.
You want maps that look nice without hand-placing every edge and corner, but you don’t want to manage a monster tileset with 50+
variants just to blend one terrain type into another.
In this post, I’ll show you the dual Tilemap technique I use in ExcaliburJS with TypeScript.
This method cuts the needed art down to just 5 tiles, keeps your code simple, and separates gameplay logic from visual decoration.
Autotiling is about automating which tile sprite to draw based on a tile’s neighbors.
Instead of painting every edge by hand, the engine checks surrounding cells and picks the right graphic.
Wang tiles – edges/corners encode transitions; flexible, but still asset-heavy.
These work well but tend to require large tilesets and entangled rules.
My last dive into autotiling, Autotiling Technique, implemented a 47 tile
tileset and bitmasking. While it worked and looked great, the algorithm forced me to do a lot of work mapping all the different
bitmasks to the 47 tiles. It took a lot of manual effort.
The classic techniques all share a common trade-off: flexibility vs. asset count.
Blob / Bitmask (47+ tiles)
Each neighbor contributes to a binary mask (8 bits → 256 possibilities).
Many cases overlap visually, so artists usually trim down to ~47 unique tiles.
This means dozens of sprites to draw and maintain.
Marching Squares (16 tiles)
Simpler 4-bit system that only considers N/E/S/W.
It’s easier to code, but you still need 16 distinct tiles.
Wang Tiles
Encode transitions on edges or corners. Very elegant mathematically, but each terrain type still multiplies your tile count.
These all work — but if you only want a clean outline between Ground and Void, they’re overkill.
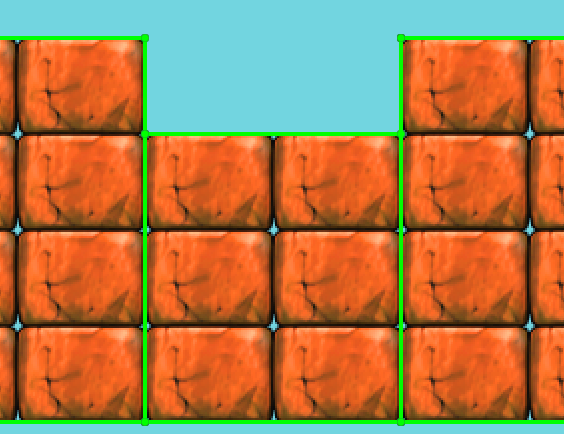
Visual: Part of the tile shows one terrain (e.g., grass), while the rest shows another (e.g., soil/ground).
Gameplay/Logic: The walkable area is determined by the world Tilemap (logic map), not the graphic overlay. So even if half the tile
visually looks like grass, the character might still be able to walk over it if the underlying tile is marked as walkable ground.This
leads to a detail that the game developer must manage: is the tile walkable or usable?
Instead of one giant Tilemap that does everything, we split the work:
World Tilemap (logic)
Just 2 states and one tile: the background tile. This is the world Tilemap and is used for game logic. For this demonstration we
are manage the states of soil or grass.
Graphics Tilemap (overlay)
Only 5 tiles: Edge, InnerCorner, OuterCorner, Filled, or Opposite Corners
These can be rotated and stacked to create all the shapes we need.
Total: 6 tiles, the background tile plus 5 different grass tiles.
The tileset i'm using has 6 tiles, the first is the 'base' soil tile that covers the world Tilemap. The next 5 are the 5 tiles needed
for this autotiling technique. For the purposes of this demonstration I included a light border around the soil tile so the end result
can more readily show how the Tilemaps line up.
I loop through all the tiles initially to setup the intial state for each Tilemap.
ts
// Instead of using a TypeScript enum, I like to define my tile states as a const object with string literal values
constTileState= {
soil: "soil",
grass: "grass",
} asconst;
// Setup the world map state
for (consttileof worldMap.tiles) {
tile.addGraphic(tileSS.getSprite(0, 0)); // This sets the default 'soil' tile from the spritesheet
tile.data.set("state", TileState.soil); // This is setting the data store of each tile to 'soil'
}
// Setup the Mesh map state
for (consttileof meshMap.tiles) {
tile.data.set("worldNeighbors", getWorldNeighbors(tile)); // Each tile in the meshMap needs to know its corresponding 'worldMap' neighbors, 4 for each tile (TL, TR, BL, BR)
tile.data.set("meshTile", null); // which index of the spritesheet do I access
tile.data.set("rotation", 0); // how do I rotate the graphic
}
ts
// Instead of using a TypeScript enum, I like to define my tile states as a const object with string literal values
constTileState= {
soil: "soil",
grass: "grass",
} asconst;
// Setup the world map state
for (consttileof worldMap.tiles) {
tile.addGraphic(tileSS.getSprite(0, 0)); // This sets the default 'soil' tile from the spritesheet
tile.data.set("state", TileState.soil); // This is setting the data store of each tile to 'soil'
}
// Setup the Mesh map state
for (consttileof meshMap.tiles) {
tile.data.set("worldNeighbors", getWorldNeighbors(tile)); // Each tile in the meshMap needs to know its corresponding 'worldMap' neighbors, 4 for each tile (TL, TR, BL, BR)
tile.data.set("meshTile", null); // which index of the spritesheet do I access
tile.data.set("rotation", 0); // how do I rotate the graphic
It is important to understand how I approached storing the tile map data. My disclaimer: there is more than one right way to do this,
and I'm certain there are more optimum means. This is simply my approach.
Not every tile will have 4 neighbors, if you consider the edge of the worldMap, there may only be one or two neighbors available which
is why I allow undefined values for the tile positions as well. The majority of the tiles can/will be surrounded by 4 world tiles. The
fact that the mesh Tilemap is offset by half of the tilesize, means that the corners of the mesh tile land on the centers of the four
neighbors, and I use this to my advantage.
While not specific to Tilemapping, controlling the mouse properly to set the worldMap tile states is important. When I click and drag
the mouse, what I'm doing is using the mouse pointer positions to set/clear the world tile state. I use the Left Mouse Button (LMB) to
set 'grass' state, and use the Right Mouse Button to clear the 'grass' state to 'soil'.
ts
let isDragging =false;
let lastTile:Tile|null=null;
let activeButton:PointerButton|null=null;
game.input.pointers.primary.on("down", e=> {
if (e.button !== PointerButton.Left && e.button !== PointerButton.Right) return; // ignore other buttons
activeButton = e.button;
isDragging =true;
lastTile =null; // reset so first tile definitely triggers
As the mouse moves with the LMB or RMB held down, the setTileState method is being called with the position and button state details.
This method uses this data to set the worldMap tile states appropriately. Then redraws the Tilemap.
The Magic, selecting which tile and how to rotate
For this section, this is where one had to sit down and consider how each tile is drawn. This is my approach;
Loop over world neighbors and 'count' grass tiles
For each 'combination' of grass tiles, select the tile index
For the couple of tiles where rotation is important, figure out 'where' the grass tiles are located
const { spriteIndex, rotation } =calculateMeshSprite(worldNeighbors); // call the function that returns the index and rotation structure
// if no tile data needed, clear out the mesh data
if (spriteIndex ===null|| rotation ===null) {
tile.data.delete("meshTile");
tile.data.delete("rotation");
continue;
}
// set the mesh data appropriately
tile.data.set("meshTile", spriteIndex);
tile.data.set("rotation", toRadians(rotation)); // this is where the rotation is converted to Radians for proper graphic rotation
}
};
This is a straightforward utility method that loops through each tile and sets the data appropriately, there's still one more magical
method to dive into.
let isTLGrass = neighbors.TL?.data.get("state") === TileState.grass;
let isTRGrass = neighbors.TR?.data.get("state") === TileState.grass;
let isBLGrass = neighbors.BL?.data.get("state") === TileState.grass;
let isBRGrass = neighbors.BR?.data.get("state") === TileState.grass;
...
So far in this function we've looped through the neighbors object and counted the grass tiles. Also, I've setup some helper flags for
assisting with orientation.
ts
...
// No grass, return the nullish state
if (grassCount ===0) return { spriteIndex: null, rotation: null };
// one grass square, use the sprite with just a corner piece, index 1
elseif (grassCount ===1) {
spriteIndex =1;
//rotate the tile based on which of the corners is grass
if (isTLGrass) {
rotation =180;
} elseif (isTRGrass) {
rotation =-90;
} elseif (isBLGrass) {
rotation =90;
} elseif (isBRGrass) {
rotation =0;
}
}
...
The grassCount: 0 scenario is super simple, return nulls so that nothing is drawn. But let us look into the grassCount:1 quick to get
an ideas of what we are working with.
We can use the utility flags for us to set the appropriate rotations, and you can see this pattern show up in the next two scenarios as
well. I won't draw the permutations but the commens walk you through each situation.
Below both 2 grass tile and 3 grass tile scenarios. The 3 grass tile scenario it just seemed easier to me to track which tile was not a
grass tile.
ts
...
// two of the neighbors are grass, that could be two different tile indexes possibly
elseif (grassCount ===2) {
// are they next to each other or cattycorner?
// first four are when they are next to each other
if (isTLGrass && isTRGrass) {
spriteIndex =2;
rotation =-90;
} elseif (isTLGrass && isBLGrass) {
spriteIndex =2;
rotation =180;
} elseif (isTRGrass && isBRGrass) {
spriteIndex =2;
rotation =0;
} elseif (isBLGrass && isBRGrass) {
spriteIndex =2;
rotation =90;
}
// next two are the 2 catty corner conditions
elseif (isTLGrass && isBRGrass) {
spriteIndex =3;
rotation =90;
} elseif (isTRGrass && isBLGrass) {
spriteIndex =3;
rotation =0;
}
}
// three grass, one soil, let's track the soil tile, its just easier
elseif (grassCount ===3) {
spriteIndex =4;
// to note, we're specifically looking for the tile that's NOT grass
if (!isTLGrass) {
rotation =0;
} elseif (!isTRGrass) {
rotation =90;
} elseif (!isBLGrass) {
rotation =-90;
} elseif (!isBRGrass) {
rotation =180;
}
}
// all grass tiles, rotation is irrelevant
elseif (grassCount ===4) spriteIndex =5;
return { spriteIndex, rotation };
};
ts
...
// two of the neighbors are grass, that could be two different tile indexes possibly
elseif (grassCount ===2) {
// are they next to each other or cattycorner?
// first four are when they are next to each other
if (isTLGrass && isTRGrass) {
spriteIndex =2;
rotation =-90;
} elseif (isTLGrass && isBLGrass) {
spriteIndex =2;
rotation =180;
} elseif (isTRGrass && isBRGrass) {
spriteIndex =2;
rotation =0;
} elseif (isBLGrass && isBRGrass) {
spriteIndex =2;
rotation =90;
}
// next two are the 2 catty corner conditions
elseif (isTLGrass && isBRGrass) {
spriteIndex =3;
rotation =90;
} elseif (isTRGrass && isBLGrass) {
spriteIndex =3;
rotation =0;
}
}
// three grass, one soil, let's track the soil tile, its just easier
elseif (grassCount ===3) {
spriteIndex =4;
// to note, we're specifically looking for the tile that's NOT grass
// if there is tile data, grab appropriate sprite, and rotate it
let sprite = tileSS.getSprite(spriteIndex, 0);
let spritecopy = sprite.clone(); // <------ if you don't create a copy of the sprite, you'll end up rotating ALL of them in the Tilemap
spritecopy.rotation = rotation;
tile.addGraphic(spritecopy); // draw the graphic
}
};
ts
constredrawMeshTileMap= () => {
let tileindex =0;
for (consttileof meshMap.tiles) {
// clear current tile graphics
tile.clearGraphics();
//grab sprite index and rotation
constspriteIndex= tile.data.get("meshTile");
constrotation= tile.data.get("rotation");
tileindex++;
// no sprite data, move on to next tile
if (!spriteIndex) continue;
// if there is tile data, grab appropriate sprite, and rotate it
let sprite = tileSS.getSprite(spriteIndex, 0);
let spritecopy = sprite.clone(); // <------ if you don't create a copy of the sprite, you'll end up rotating ALL of them in the Tilemap
spritecopy.rotation = rotation;
tile.addGraphic(spritecopy); // draw the graphic
}
};
The final thing left to do is simply managing the 'drawing' of the graphics to each tile location. We do this by looping through the
mesh tiles, and if there is data present, redraw it to the tile.
ExcaliburJS is a friendly, TypeScript 2D game engine that can produce games for the web. It is free and
open source (FOSS), well documented, and has a growing, healthy community of gamedevs working with it and supporting each other. There
is a great discord channel for it JOIN HERE, for questions and inquiries. Check it out!!!
Autotiling is one of those problems that looks simple but can quickly balloon into complexity — traditional methods often demand dozens
of tiles and intricate bitmask rules.
By splitting responsibilities between two Tilemaps, we drastically simplify the workflow:
World map handles logic with just 2 states (soil, grass) and a base tile graphic.
Graphics map overlays visuals with only 5 tiles.
Total: 5 tiles instead of 47+.
The dual Tilemap method keeps your code clean, your art requirements minimal, and your system flexible for new biomes or mechanics.
If you want to dig into the details, check out the demo on Itch.io and the
source on GitHub.
It’s a simple idea that pays off big when your worlds start to grow.
We now ship a excalibur.development.js, which provides additional debug information about issues that you would probably not want to ship to a production game. This provides a better development experience for our devs helping them find bugs faster.
Additionally we ship both an UMD and ESM bundle in Excalibur for modern bunders, the ESM build drastically reduces bundle sizes for folks.
A big boost to productivity is the new Excalibur CLI for quickly scaffolding games in your favorite bundler technology or even vanilla JavaScript! This tool pulls all our open source template repos from github.
sh
npx create-excalibur@latest
sh
npx create-excalibur@latest
This tool was built by contributor Manu Hernandez, big thanks to him for donating his time and building this great tool!
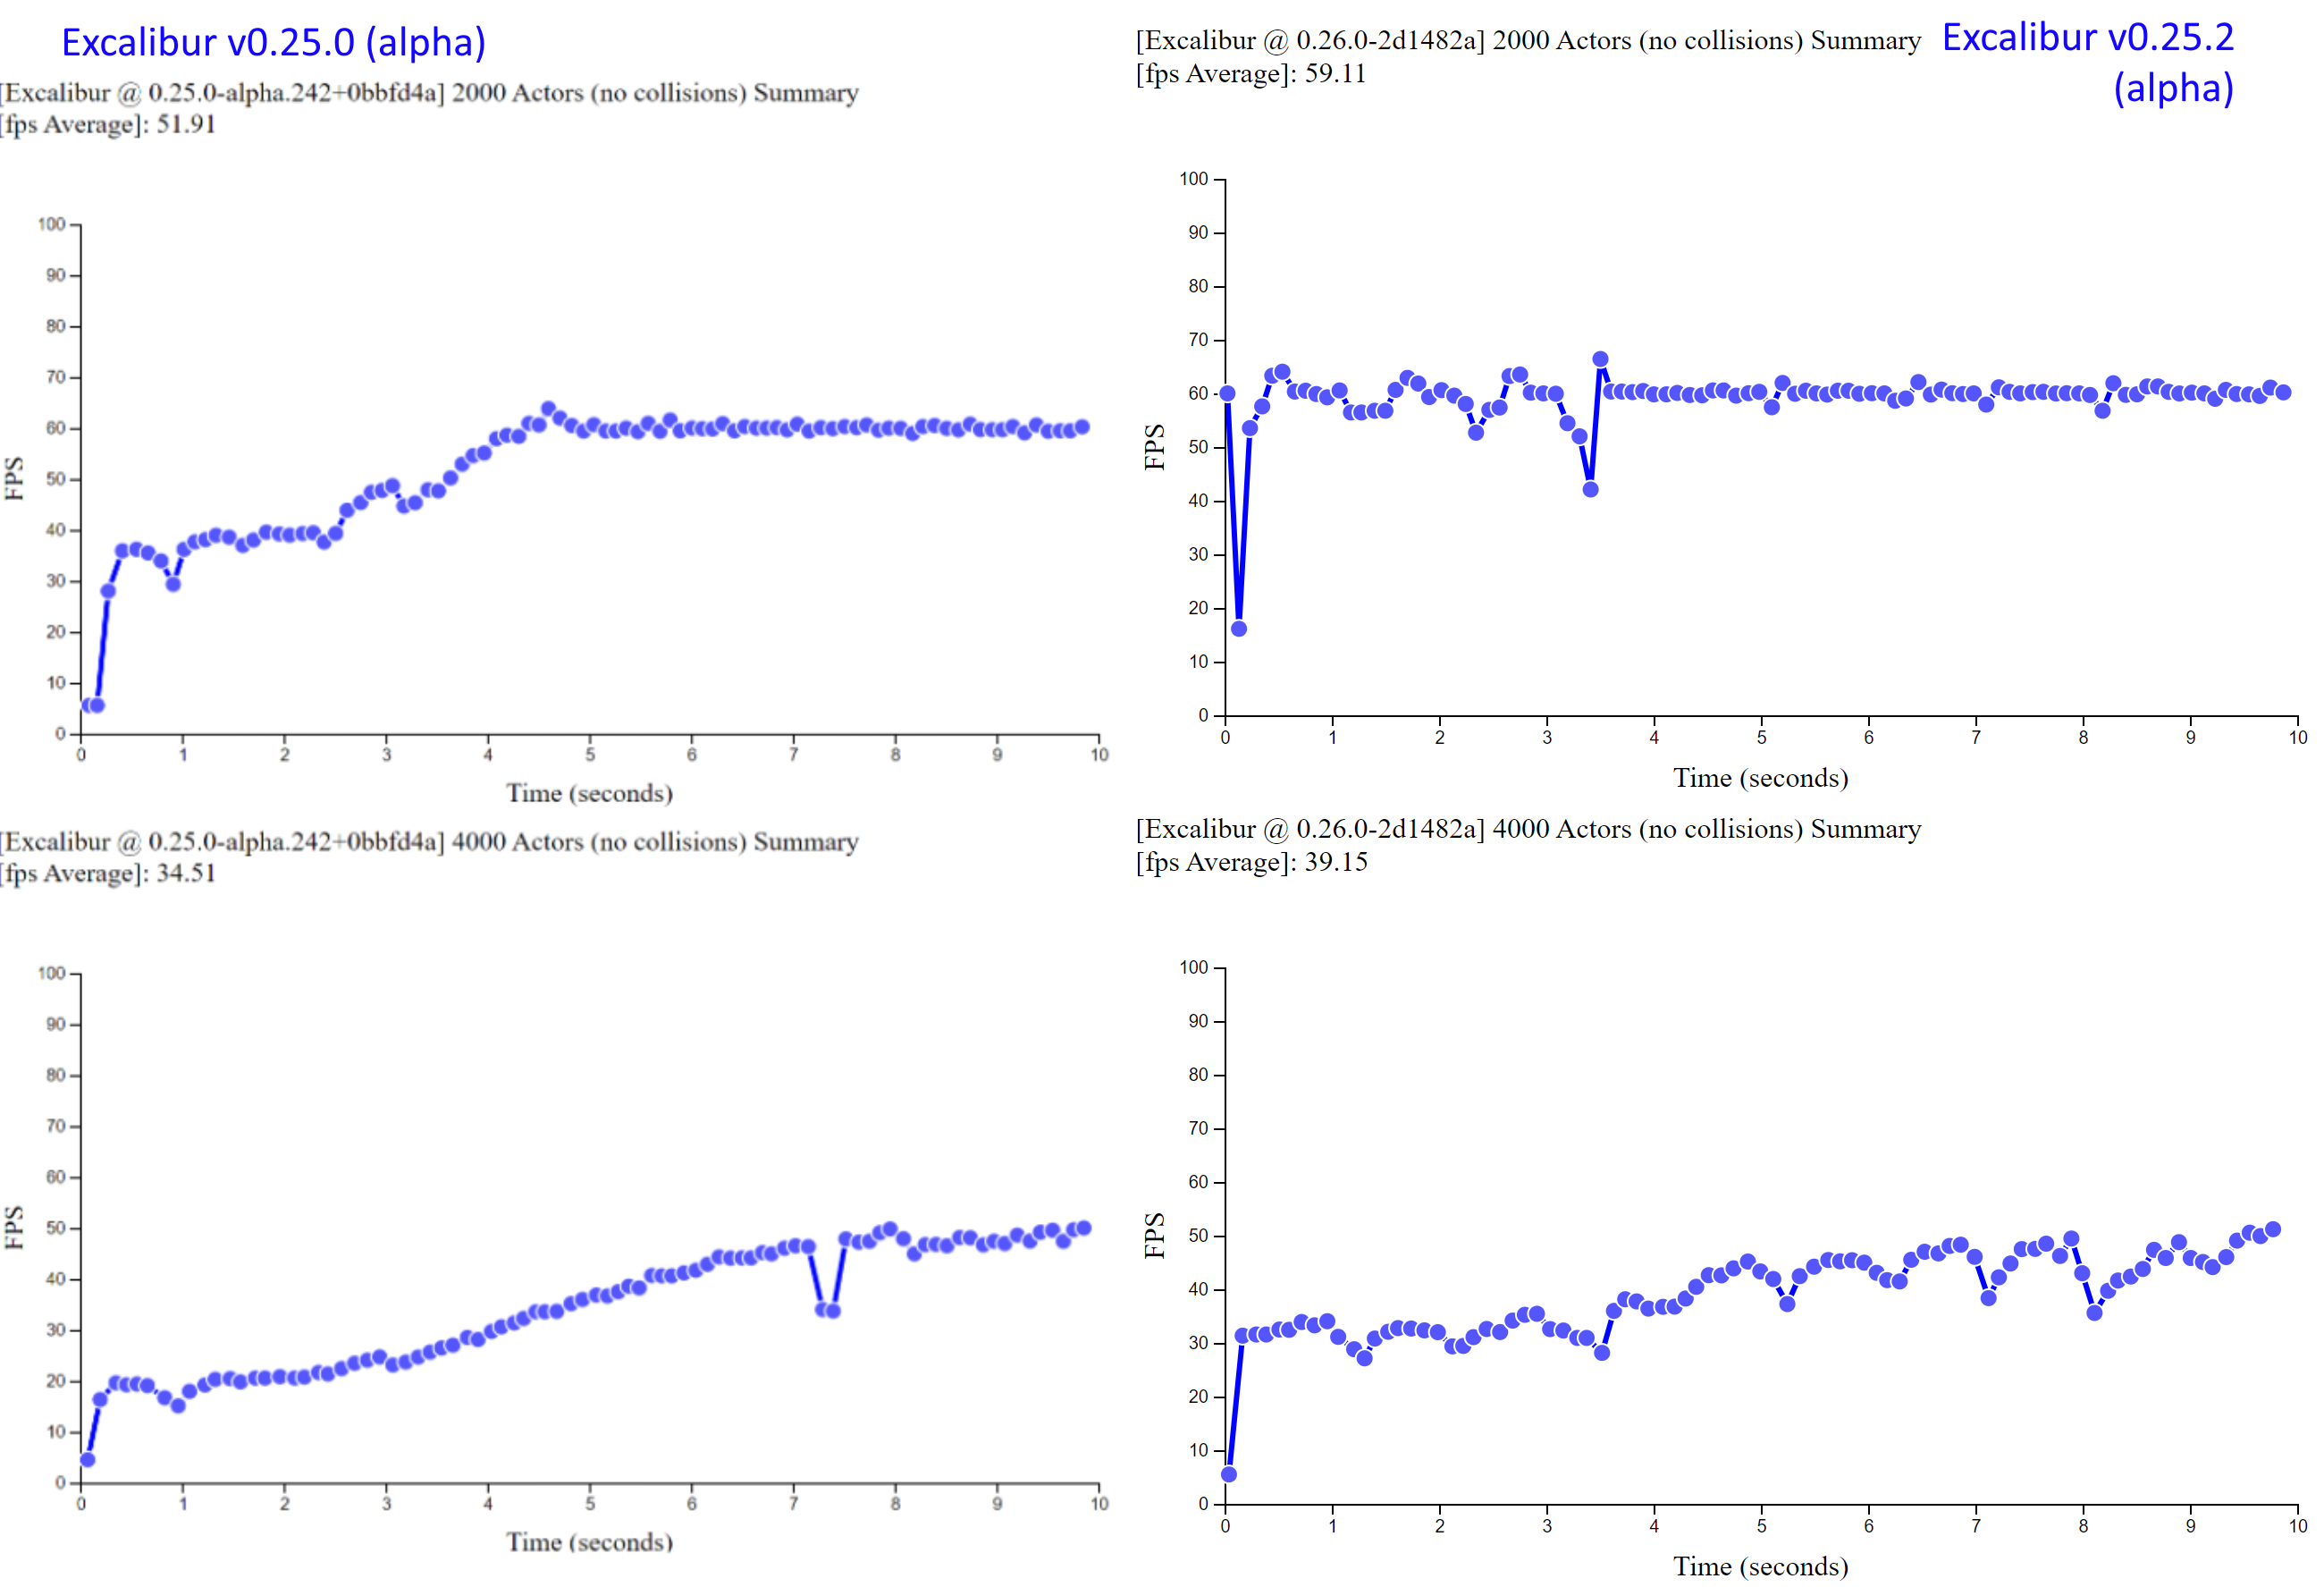
We've really turned the screws on performance in excalibur with v0.30.x being roughly 2-3 times faster than v0.29.x, both in the physics and the graphics! A lot of this was achieved through new data structures, and removing allocations from the hot loop using arena style object pools.
In the physics realm we switched to a new spatial data structure "SparseHashGrid" that seems to yield better performance than our "DynamicAABBTree" previously, especially for large numbers of colliders. Autsider666 really helped dig into this collision performance endeavor, check out his Idle Survivors. We can support many 100s of collisions at once!
if (engine.input.keyboard.isHeld(ex.Keys.ArrowRight)) { ... }
if (engine.input.keyboard.isHeld(ex.Keys.ArrowLeft)) { ... }
if (engine.input.keyboard.isHeld(ex.Keys.ArrowUp)) { ... }
if (engine.input.keyboard.isHeld(ex.Keys.ArrowDown)) { ... }
ex.Debug.drawRay(
new ex.Ray(this.pos, this.vel),
{ distance: 100, color: ex.Color.Red }
);
}
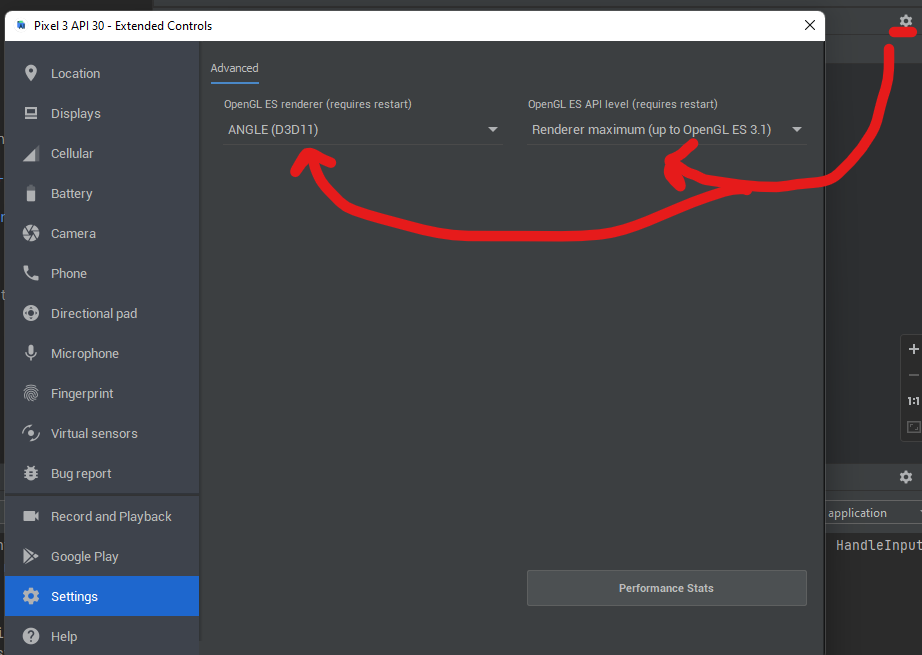
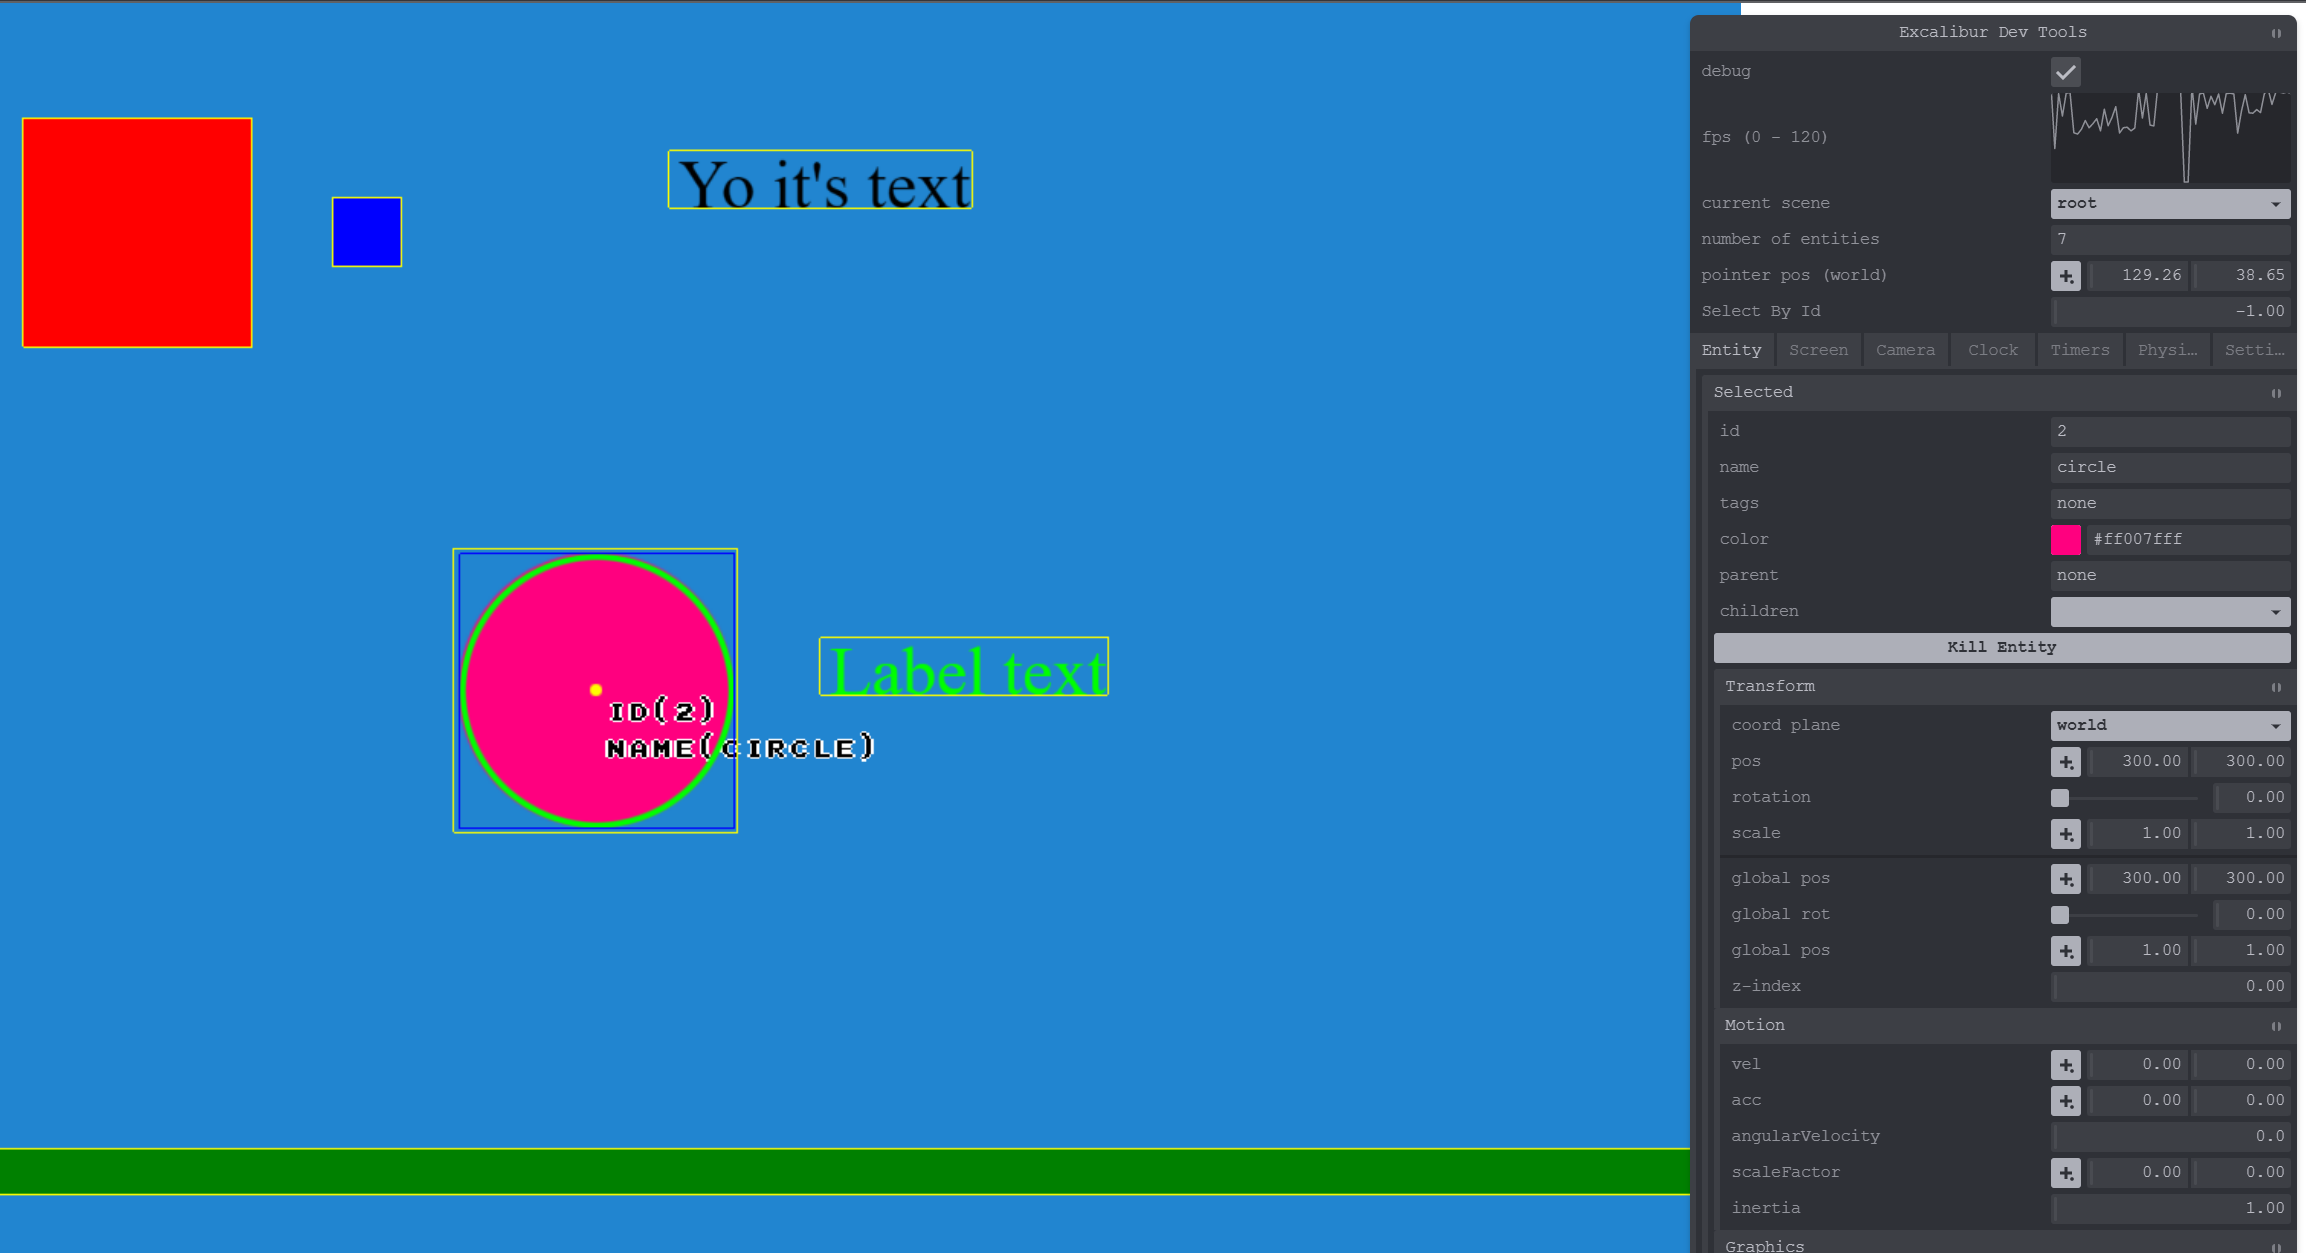
We now have a chrome & firefox extension to help debug your games in the browser. (This is a great place to contribute to open source! We have a LONG wish list for the plugin)
Big thanks to Adam Due Hansen for adding recent fixes that allow debug settings to be saved across browser refresh!
These are a powerful tool for doing computation over time, and one of the best examples of that is animation. Coroutines are create for complex behavior and animations over time. They read very linearly for doing complex sequences over time compared to another approach where you might set flags and track timing in a class.
You can do lots of cool things in the body of coroutines in excalibur:
typescript
ex.coroutine(function*() {
...
yield100; // wait 100ms
yield; // wait to next frame
yield Promsie.resolve(); // wait for promise
yield* ex.coroutine(function* () { ..}); // wait for nested coroutine
});
typescript
ex.coroutine(function*() {
...
yield100; // wait 100ms
yield; // wait to next frame
yield Promsie.resolve(); // wait for promise
yield* ex.coroutine(function* () { ..}); // wait for nested coroutine
First class pixel art art support with custom shaders/settings for the nicest looking pixel art you've ever seen. This removes common shimmering/banding artifacts that are visible when using pixel art with nearest neighbor filtering.
typescript
constengine=new ex.Engine({
pixelArt: true,
...
});
typescript
constengine=new ex.Engine({
pixelArt: true,
...
});
Check out pixelArt: true! Smooth as butter AA but still preserving the pixel art!
Compared with before when using antialiasing: false, you may need to go fullscreen but obvious banding and fat pixels are visible. This is a common visual issue when working with pixel art
The magic is doing subtle subpixel antialiasing along the pixel seams to avoid artifacts by adjusting the UVs and letting bilinear filtering do the hard work for us.
We now have convenient and performant tiling support for sprites and animations! You can specify you wrapping mode in x/y. If one of the dimensions exceeds the intrinsic width/height of the original image it can be Clamped (which stretches the last pixel), Repeat (which repeats the pixels from left to right), or RepeatMirror (which repeats the pixels from the last edge like a mirror).
You already saw the fireworks! With GPU particles you can run hundreds of thousands of particles no sweat using instanced rendering with transform feedback under the hood. This means that the entire particle simulation runs on the GPU for maximum speed.
The core contributors around Excalibur have started a business! We are modeling ourselves off of w4games, providing: educational content, support, project development, and console porting services. Excalibur.js and Excalibur Studio will always be open source.
Our plan for 2025 is to release 2 commercial games on various platforms AND offer Nintendo Switch Console publishing!!!
We are planning on adding a "Sound Manager" to organize sounds into different "tracks" that can be mixed and muted independently. For example sound effects and background music.
Folks have implemented this in almost every game made, so we plan on adding a first party implementation to make this easy.
The future versions of Excalibur will have lighting features to really enhance your games. Big thanks to Justin for digging in and figuring out our approach here!
The plan is to add spot lights and point lights, under the hood this uses a technique called raymarching.
We are working on an open source visual editor for Excalibur, so that folks can drag and drop, design, code, configure games, and export to various platforms!
We'll be opening up the source code as soon as we have something that works for a vertical slice of game dev.
The majority of APIs are now stable and not much will change between now and the v1.0 announcement. Right now we are working on adding a couple more features, light refactoring, and cleaning up some edge case bugs.
Today we are excited to announce the biggest and best version of Excalibur.js yet! We have a lot of accomplishments to talk about and a lot of thank you's to give!
With this release we've added a brand new tutorial inspired by Flappy Bird. This was built from the ground up to help you write excalibur games like we write them. This tutorial is geared at building a sustainable project structure that can grow as your game design does. Check out the full source code and play it now. Big thanks to discord user .rodgort for all the helpful feedback.
Did you know we have an Excalibur CLI to help you bootstrap games quickly? Check out our new quick start guide to get up to speed in record time with your new project in your preferred frontend tech (including vanilla.js).
sh
npx create-excalibur@latest
sh
npx create-excalibur@latest
We've updated all the Excalibur.js templates that power this CLI to the latest and greatest!
Did you know that community member Manu Hernandez built this? Send him a thanks on the Discord!
We are publishing new excalibur.development.js builds that have increased debug output to catch common issues while in development. For example if you forget to add an Actor to a scene (a common thing that I run into)!
typescript
constorphan=new ex.Actor({
name: 'orphaned'
});
// OOOPS! I forgot to add orphan Actor to a Scene
typescript
constorphan=new ex.Actor({
name: 'orphaned'
});
// OOOPS! I forgot to add orphan Actor to a Scene
When NODE_ENV=production these extra warnings are removed for you prod build!
This big quality of life feature was added by Matt Jennings!
You can now use the ex.Debug.* API to do debug drawing without needing to know about a graphics context. These draws are only visible when the engine is in debug mode ex.Engine.isDebug.
This is great for check your points, rays, lines, etc. are where you expect them to be!
This release really had a strong focus on improving performance across the board in Excalibur. Community member Autsider was a BIG BIG help in this area.
New Image Renderer that has 2x performance of draws
New "Sparse Hash Grid" Collision Spatial Data Structure that improves collision performance
Code optimizations to remove allocations in the hot loop where possible
Reduces javascript GC pauses
Improves general speed of the engine
ECS optimizations the speed up Entity queries
We also have a new Excalibur Bunnymark that stresses the renderer, I can get to 100k at 30fps on my Surface Pro Laptop!
You can now source images from SVG literal strings, SVG files, and HTML Canvas elements! This increases the flexibility of images that you can use to make your games. Plus SVG and Canvas rock 🤘
New ex.Slide scene transition, which can slide a screen shot of the current screen: up, down, left, or right. Optionally you can add an ex.EasingFunction, by default ex.EasingFunctions.Linear. Think the Legend of Zelda dungeon room transition
We now have a convenient flash action that can be used to flash a color on your actor's graphics. This is super useful for things that take damage, or if you need to indicate something to the player.
The newex.NineSliceGraphic can be for creating arbitrarily resizable rectangular regions, useful for creating UI, backgrounds, and other resizable elements.
Excalibur now watches for textures that have not been drawn in 60 seconds and unloads them from the GPU. This is essential for the bigger games with lots of different assets over time.
The Excalibur.js contributors are offering consulting services! You can hire us to do game dev, custom dev, or support! If you're interested check out our current list of products https://caliburn.games/products/
Caliburn Games' goal is to build friendly games in TypeScript and support the Excalibur.js community and open source project.
We are really excited and optimistic about the future of Excalibur.js and we have a lot of cool plans for 2025. We are re-affirming our commitment to being an open source project, we will always be open source and will never change the license from BSD.
Keep an eye out for Excalibur courses @ https://excaliburjs.tv, we are looking to publish a number of free and paid course options.
We are building an OPEN SOURCE "Excalibur Studio" visual editor, this is to further our mission to bring game development to as many people as possible. The editor will be a pay what you want model, where $0 is totally acceptable. We don't want income to be a boundary for people to get into making games.
Caliburn Games will be publishing games to various platforms so look out for them in 2025! Also reach out if you are interested in hiring us to help with your games!
Our plan is to have a release candidate for v1 in early 2025, the core engine is reaching a point where we are really happy with it. Not much will change in the API from v0.30.0 to v1.0.0.
A lot of folks have asked about WebGPU, we are going to wait on a renderer implementation until the standardization of the API to stabilize and for WebGPU implementations to be on by default in browsers.
As a game developer, if the thought of hand crafting a level does not appeal to you, then you may consider looking into procedural
generation for your next project. Even using procedural generation, however, you still need to be able to turn your generated map
arrays into a tilemap with clean, contiguous walls, and sprites that match up cleanly, as if it was drawn by hand. This is where a
technique called auto-tiling can come into play to help determine which tiles should be drawn in which locations on your tilemap.
In this article, I will explain the concept of auto-tiling, Wang Tiles, binary and
bitmasks, and then walk through the process and algorithms associated with using
this tool in a project.
Auto-tiling converts a matrix or array of
information about a map and assigns the corresponding tile texture to each tile in a manner that makes sense visually for the tilemap
level. This uses a tile's position, relative to its neighbor tiles to determine which tile sprite should be used. Today we will focus
on bitmask encoding neighbor data, although there are other techniques that can be used to accomplish this.
One can get exposed to auto-tiling in different implementations. If you're using a game engine like Unity or
Godot, there are features automatically built into those packages to enabling auto-tiling as you draw and
create your levels. Also, there are software tools like Tiled, LDTK, and
Sprite Fusion, that are a little more tilemap specific and give you native tools for auto-tiling.
Auto-tiling has provided the most benefit when we think about how we can pivot from tilemap matrices or flat indexes representing the
state of a tilemap, to a rendered map on the screen. Let us say you have a tilemap in the form of a 2d matrix with 1's and 0's in it
representing the 'walkable' state of a tile. Let us assign a tile as a floor (0) piece or a wall (1) piece. Now, one can simply use two
different tiles, for example:
a grass tile and a dirt path tile
We could take a tilemap matrix like this:
and use these two tiles to assign the grass to the 1's and the 0's to the path tile. It would look like this:
This is technically a tile-map which has been auto-tiled, but we can do a little better.
Wang tiles do not belong or associate with game development or tile-sets specifically, but come from mathematics. So, why are we
talking about them? The purpose of the Wang tiles within the scope of game development is to have a series of tile edges that create
matching patterns to other tiles. We control which tiles are used by assigning a unique set of bitmasks to each tile that allows us
reference them later.
Wang tiles themselves are a class of system which can be modeled visually by square tiles with a color on each side. The tiles can be
copied and arranged side by side with matching edges to form a pattern. Wang tile-sets or Wang 'Blob' tiles are named after Hao Wang, a
mathematician in the 1960's who theorized that a finite set of tiles, whose sides matched up with other tiles, would ultimately form a
repeating or periodic pattern. This was later to be proven false by one of his students. This is a massive oversimplification of Wang's
work, for more information on the backstory of Wang tiles you can be read here: Wang Tiles.
This concept of matching tile edges to a pattern can be used for a game's tilemap. One way we can implement Wang tiles in game
development is to create levels from the tiles. We start with a tile-set that represents all the possible edge outcomes for any tile.
The numbers on each tile represents the bitmask value for that particular permutation of tile design. We then can see how you can swap
these tiles for a separate texture below. In the image above, there are a couple duplicate tile configurations, and they are shown in
white font.
The magic of Wang tiles is that it can be extended out and create unique patterns that visually work. For example:
A bitmask is a binary representation of some pattern. In the scope of this conversation, we will use a bitmask to represent the 8
neighbors tiles of an given tile on a tilemap.
A bitmask is a binary representation of some pattern. In the scope of this conversation, we will use a bitmask to represent the 8
neighbors tiles of an given tile on a tilemap.
So our normal counting format is designed as base-10. This means that each digit in our number system represents digits 0-9 (10
digits), and the value of each place value increases in power of base 10.
So in the number '42', the 2 represents - (2 * 100) which is added to the 4 in the 'tens' place, which is (4 *
101), which equals 42.
(2 * 1) + (4 * 10) = 42
(2 * 1) + (4 * 10) = 42
T This in binary looks different, as binary is base-2, which means that each digit position has digits 0 and 1, (2 digits). This is the
counting system and 'language' of computers and processors.
Quickly, let's re-assess the previous example of '42'. 42 in binary is 101010. Let's break this down in similar fashion.
Starting from the right placeholder and working our way left... The 0 in the right most digit represents 0 * 20. The next
digit represents 1 * 21... and on for each digit and the exponent increases each placeholder.
That is how information in computers is encoded. We can use this 'encoding' scheme to easily represent binary information, like 'on' or
'off', or in this discussion, walkable tile or not walkable. This is why in the tile-set matrix example above, we can flag non-walkable
tiles as '1', and walkable tiles as '0'. This is now binary encoded.
A bit is one of these placeholders, or one digit. 8 of this bits together is a byte. Computers and processors, at a minimum, read at
least a byte at a time.
We can use this binary encoding for the auto-tiling by representing the state of each of a tile's neighbors into 8 bits, one for each
neighbor. This means that the condition and status of each neighbor for a tile can be encoded into one byte of data (8 bits) and CAN be
represented with a decimal value, see my earlier explanation about how the number 42 is represented in binary.
So the whole point of this section is to get to this example: we are going to encode the neighbor's data for an example tile.
Now the tile we are assigning the bitmask to is the green, center tile. This tile has 8 neighbors. If I start reading the 1's and 0's
from the top left and reading right, then down, I can get the value: 101 (top row) - 01 (middle row) - 101 (bottom row). Remember to
skip the green tile.
All together, this is 10101101, which can be stored as a binary value, which can be converted to a decimal value: 173. Remember to
start at the rightmost bit when converting.
Now we can use that decimal value of 173 to represent the neighbor pattern for that tile. Every tile in a tilemap, can be encoded with
their 'neighbors' bitmasks.
As you saw earlier, the wang tiles had bitmask values assigned to them. This is how we know which tile to substitute for each bitmask.
We have already covered the hard part. In this section we are pulling it all together in a walkthrough of the overall high level
process.
Here are the steps we are covering:
Find or create a tile-set spritesheet that you would like to use Create your tilemap data, however you like. Loop through each index of
tile, and evaluate the neighbor tiles, and assign bitmask Map the bitmap values to the 'appropriate' tile in your tile-set (this is the
long/boring part IMO) Iterate over each tile and assign the correct image that matches the bitmask value Draw your tilemap in your game
Creating a tile-set Here is an example of a tile-set that I drew for the demo project.
These 47 tiles represent all the different 'wall' formations that would be required. I kept my floor tiles separate in a different file
so that it is easier to swap out. The floor is drawn as a separate tile underneath the wall. Each tile represented in the grid is
designed to match up with a specific group of neighbor patterns. Let's take the top-left tile:
This tile is intended to be mapped to a tile where there are walled neighbors on the right, below, and bottom right of the tile in
question. There maybe a few neighbor combinations ultimately that may be mapped to this tile, in my project I found 7 combinations that
this tile configuration would be mapped to.
If you look through each tile you can see how it 'matches' up with another mating tile or tiles in the map. For my implementation, I
spent time testing out each configuration visually to see which tile different bitmasks needed to be mapped to.
Now we will use either a 2d matrix or a flat array in your codebase, with each index representing a tile. I use a flat array, with a
tilemap width and height parameter. It is simply preference.
You can manually set these values in your array, or you can use a procedural generation algorithm to determine what your wall and floor
tiles. I can recommend my Cellular Automata aarticle that I wrote earlier if you
are interested in generating the tilemap procedurally. When this is completed, you'll have a data set that will look something like
this.
For each index of your array, you will need to capture all the states of the neighbor tiles for each tile, and record that value on
each tile. I would refer to the previous section regarding how to calculate the bitmasks.
Map bitmask values to each tile sprite in spritesheet
Here is the monotonous part. For a byte, or an 8-bit word, the amount of permutations of tile patterns is 256. That's a lot of
mappings. Now I did mine the hard way, manually, one by one. But there may be easier ways to do this. I use Typescript, so I will share
a bit of what my mappings look like. Each number key in the object is the bitmask value, and its mapped to a coordinate array [x, y]
for my spritesheet that I shared earlier in the article. Now, I could have put them in order, but that does not really serve any
benefit.
The last two steps we'll do together. Now we simply need to iterate over our tilemap, assign the appropriate sprite tiles. I'm using
Excalibur.js for my game engine, and the code is in Typescript, but you can use whichever tool you would prefer.
ts
draw(): TileMap {
// call the method that loops through and configures all the bitmasks
let bitmask =this.createTileMapBitmasks(this.map);
let tileindex =0;
for (consttileofthis.map.tiles) {
tile.clearGraphics();
// if the tile is solid, draw the base tile first, THEN the foreground tile
if (tile.data.get("solid") ===true) {
// add floor tile
tile.addGraphic(this.baseTile);
// using the tile's index grab the bitmask value
let thisTileBitmask = bitmask[tileindex];
// this is the magic... grab the coordinates of the tile sprite from tilebitmask, and provide that to Excalibur
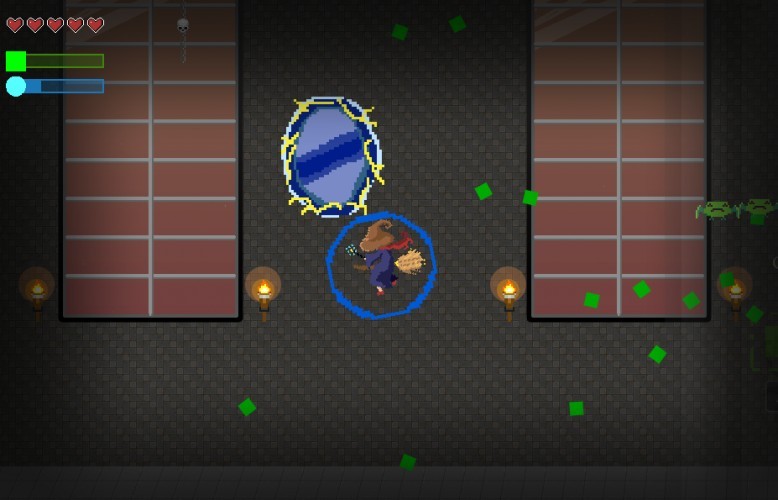
In this demo application, I'm using Excalibur.js engine to show how auto-tiling can work, and its benefits in game development. The
user can click on the tilemap to draw walkable paths onto the canvas. As the walkable paths are drawn, the auto-tiling algorithm will
automatically place the correct tile in its position based on the neighbor tile's walkable status.
There are some controls at the top of this app, a button to reset the tilemap settings back to not walkable, so one can start over.
Also, two drop downs that let the user swap out tile-sets for different styles. This shows the benefits of having standardized Wang
tiles for your tile-sets. For example, in this demo, we have three Wang tile-sets. When you swap them out, it can automatically draw
them correctly into your tilemap.
Grass
Snow
and Rock
Why Excalibur
Small Plug...
ExcaliburJS is a friendly, TypeScript 2D game engine that can produce games for the web. It is free and
open source (FOSS), well documented, and has a growing, healthy community of gamedevs working with it and supporting each other. There
is a great discord channel for it JOIN HERE, for questions and inquiries. Check it out!!!
Conclusions
TThat was quite a bit, no? We covered the concept of Autotiling as a tool you can use in game developement. We discussed the benefits
of Wang tiles for your projects and that they allow for the auto selection of the correct tile sprites to use based off of bitmask
assignments. We dug into bitmask and base-2 binary encoding a little bit just to show how we were encoding the neighbor tile
information into a decimal value so we could map the tile sprites appropriately. We finished this portion by doing an example tile
encoding of neighbors to demonstrate the process.
We went step by step throught he process of autotiling, looking at tilesets, looking at code snippets, and finishing at the demo
application on itch. I hope you enjoyed this take on autotiling, as mentioned above, this is NOT the only way to do this, there are
other ways of accomplishing the same effect. You also can tweak this to your own liking, for instance, you can introduce varying tiles
so you can use different floor tiles, or adding decord on to walls to add additional variety and add a feeling of greater immersion
into the worlds your building. Have fun!
I love procedural generation. As a hobbyist game developer, it is the concept and technique that I keep reaching for in my games. This article is about Cellular Automata, which follows suit of my previous articles regarding other procedural generation strategies for game development. In my last article, we studied the Wave Function Collapse Algorithm. Staying within that topical thread of procedural algorithms which can be leveraged in game development, let's turn our focus to Cellular Automata.
Cellular Automata, or CA for short, is an algorithm which has some key potential benefits within the field of game development. You may
have seen in certain games, for example Dwarf Fortress or Terraria for example, where organic looking caves are generated, or some map
patterns that look naturally grown. Essentially, it uses a grid based data set, and for each discrete unit in that grid, uses the state
of all its neighbors to determine the end state of that cell in the ending simulation result.
The early beginnings of the algorithm originated in the 1940's while scientists were studying crystal growth. That study, plus others
including self-replicating robot experiments led to the realization of using a method of treating a system as a collection of discrete
units (cells), and calculating their behavior based on the influence of each cell's neighbors. For more details on this:
Cellular Automata
In the 1970's, James Conway famously created a simulation called the Game of Life. This very simple simulation, which had only four rules, created
a very dynamic and varied group of results that bounced between appearing random and controlled order. The rules determined each cell's future state as classified as dying due to underpopulation or overpopulation, creating a new living unit due to reproduction, or just
continuing to exist with the correct balance of population around that unit.
There are some common implementations of using Cellular Automata in game development. The classic trope is using the CA algorithm for
generating tilemaps of organic looking areas or cave systems.
Another application is simulating the spread of fire across an area. Brogue is a good example of how this can be used.
Other aspects is simulating gas expansion in an area, or the spread of a virus, or enemy reproduction simulations for generating new
enemies.
For explaining the CA algorithm, we will demonstrate code snippets that demonstrate TypeScript and using Excalibur.js, but this can be done in any languages and framework of your choice.
The algorithm will have us walk through the grid tile by tile and we will either leave the one or zero in place, or we will flip that value to the opposite, meaning a zero will become a one, and vice versa. The results of this assessment needs to be kept in a new or cloned array, as to not overwrite the starting array's values as you iterate over the tiles.
The rules around flipping the values in each cell will depend on each implementation of the CA algorithm. These can be variable rules, each implementation can be unique in that instance. This gives you some agency and control over how you want your simulation to run. I've tailored this function with the flexibility to pass in the rules on each iteration. The rules are regarding how to handle out of bounds indexes, and what cutoff points are being used.
ts
// Defining our CA function, passing in the grid, dimensions, and rules for OOB indexes and cutoff points
exportfunctionapplyCellularAutomataRules(
map:number[],
width:number,
height:number,
oob:string|undefined,
cutoff0:number|undefined,
cutoff1:number|undefined
):number[] {
constnewMap=newArray(width * height).fill(0);
let zeroLimit =4;
if (cutoff0) zeroLimit = cutoff0 +1; //this creates the less than effect
let oneLimit =5;
if (cutoff1) oneLimit = cutoff1; // this creates the greater than or equalto
for (let i =0; i < height * width; i++) {
for (let x =0; x < width; x++) {
constwallCount=countAdjacentWalls(map, width, height, i, oob); //counts walls in neighbors
if (map[i] ===1) {
if (wallCount < zeroLimit) {
newMap[i] =0; // Change to floor if there are less than cuttoff0 adjacent walls
} else {
newMap[i] =1; // Remain wall
}
} else {
if (wallCount >= oneLimit) {
newMap[i] =1; // Change to wall if there are cutoff1 or more adjacent walls
} else {
newMap[i] =0; // Remain floor
}
}
}
}
return newMap;
}
To note, this approach to the CA algorithm is for the sake of THIS article. Other approaches can be implemented. Let's define our rules for the scope of this article.
If the starting value for a tile is a zero, then to flip it to a one, the neighbors must have five or more ones surrounding the starting tile.
If the starting value for a tile is a one, then to flip it to a zero, the neighbors must have three or fewer ones surrounding the starting tile.
For tiles on the edges of the grid, which will not have 8 neighbors, out of bound regions will be treated as ones or 'walls'
With these rules in place, which can be modified and tailored to your liking, we can use them to determine the next iteration of the grid by going tile by tile and setting the new grid's values based on each tile's neighbors.
For the rule on out of bound neighbors, you can use a variety of different rules to your liking. You can treat them as constants, like in this instance, we treat them as walls. You can have them be treated as floors, which will change how your simulation runs, producing a more 'open' result. You can also have the out of bound tiles mirror the value of the starting value, i.e. if your starting tile on the edge is a one, then out of bound tiles are all ones, and vice versa.
ts
// This function takes in the grid and dims, which index is being inspected, and the rules on OOB tiles
// The 4 types of rules provided are for constant values, floor and wall, random
// , and mirror
case"floor":
break;
case"wall":
count++;
break;
case"random":
let coinflip =Math.random();
if (coinflip >0.5) count++;
break;
case"mirror":
if (map[index]==1) count++;
break;
default:
count++; // Perceive out of bounds as wall
break;
}
}
}
}
return count;
}
So starting at the first tile of the grid, you will look at the eight neighbors of the tile, in this instance, five of them are out of bound indexes. You add all the walls up in the neighbors,since the starting value is a zero, if the value is greater or equal to five, in the new grid/array, you will place a one in index zero for the new grid. This is how you flip the values. If, for instance, there would be less than five walls for the neighbors of this index, the value would have remained zero. You repeat this process for each
tile in the grid/array.
At the end, when you have completely iterated over each tile, you will have a new grid of tiles that are now set to zeroes or ones, based on that starting array. You can use this new grid as a completed result, or you can re-run the same simulation using this new grid as your 'new' starting array of data.
ts
// function that clears out the existing Tilemap and redraws it based on the new returned tile array
This walkthrough will simply use an array of numbers. With this array of numbers we will use a noise field, to represent random
starting values, and then we will utilize the CA algorithm over multiple steps to highlight how it can be utilized.
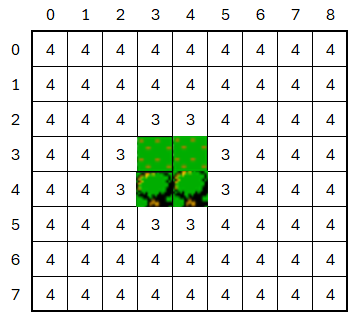
Let's start with an empty array of numbers. We will represent the flat array as a two dimensional grid, with x and y coordinates. This is a 7 x 7 grid, which will be an array of forty-nine cells. As we process throught he CA algorithm, we will be recording our results
into a new array, as to not overwrite the input array while we are iterating over the indexes.
For the CA algorithm, it is suggested to fill the initial array with random ones and zeroes. You can use a Perlin noise field, or a Simplex noise
field or just use your languages built in random function to fill the field. Here is ours:
Now we start the process of looping through each index and either leave them alone of flip the value between 0 and 1 based on the values of the neighbors. For this simulation we treat out of bound indexes as walls.
The first index of the array is the top left corner of the grid. This is relatively unique in the sense that this index only has three real neighbors. But as we mentioned before, out of bound (OOB) indexes will be treated as walls. If we count up each neighbor index,
plus the OOB indexes, we get a value of seven. Since this count is higher than four, we will flip this indexes value to one in the new array we are creating.
The second index of the array is a one. Now this index only has three OOB indexes that will count as walls.
This index only has one addition one in its neighbors, and if that's added to the three OOB index values, that puts our value to four. In our algorithm we are using today, the value that is required to change a one to a zero is if it has less than four walls as
neighbors. With that, we will leave this one in place and insert this value in the new array.
We will follow this process for each index with the given rules below:
If the original value is one in the starting index, to be set to zero in the new array, the neighbor values have to be less than four.
If the original value is zero in the starting index, to be set to one in the new array, the neighbor values need to be five or higher.
Let's speed this process along a bit.
Finishing the first row.
Generating the 2nd row.
Generating the 3rd row.
Generating the 4th row.
Generating the 5th row.
Generating the 6th row.
Generating the Final row.
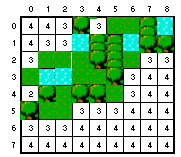
Now we have a completed array of new values. The thing about the CA algorithm that is favorable is that you can reuse the algorithm again on the new set of values to generate deeper levels of generation on the initial data set.
Let's run the simulation on this new data and see how it turns out.
So you see how numbers start to collect together to create natural, organic looking regions of walls and floors. This is particularly handy technique for generating cave shapes for tilemaps.
The demo simply consists of a 36x36 tilemap of blue and white tiles. Blue tiles represent the walls, and white tiles represent the
floor tiles. There are two buttons, one that resets the simulation, and the other button triggers the CA algorithm and uses the tilemap
to demonstrate the results.
Also added to the demo is access to some of the variables that manipulate the simulation. We can now modify the behavior of the OOB
indexes. For instance, instead of the default 'walls', you can now change the sim to use random setting, mirror the edge tile, or set
it constant to 'wall' or 'floor'.
You also have to ability to see what happens when you unbalance the trigger points. Above we defined 3 and 5 as the trigger points for
flipping a tile's state. You have the ability to modify that and see the results it has on the simulation.
The demo starts with a noise field which is a plugin for Excalibur. Using a numbered array representing the 36x36 tilemap, which has
ones and zeroes we can feed this array into the CA function. You can repeatedly press the 'CA Generation Step' button and the same
array can be re-fed into the algorithm to see the step by step iteration, and then can be reset to a new noise field again to start
over.
Why Excalibur
Small Plug...
ExcaliburJS is a friendly, TypeScript 2D game engine that can produce games for the web. It is free and
open source (FOSS), well documented, and has a growing, healthy community of gamedevs working with it and supporting each other. There
is a great discord channel for it HERE, for questions and inquiries. Check it out!!!
Conclusions
So, what did we cover? We discussed the history of Cellular Automata and some generalized use cases for CA within the context of game
development. We covered the implementation of the steps to take to perform the simulation on a grid of data, and then we conducted a
walk through example of using the algorithm. Finally, we introduced a demo application hosted on itch, and shared the repository in
case one is interested in the implementation of it.
This algorithm is one of the easier to implement, as the steps are not that complicated either in cognitive depth or in mathematical
processing. It is one of my favorite simple tools that reach for especially for tilemap generation when I create levels. I urge you to
give it a try and see what you can generate for yourself!
One challenge of indie game development is about striking a balance. Specifically, the balance between hand crafted level design,
player replayability, and the lack of enough hours in a day to commit to being brilliant at both. This is where people turn to
procedural generation as a tool to help strike that balance. One of the most magical and interesting tools in the proc gen toolbox is
Wave Function Collapse (WFC). In this article, we'll dive into the how/why of WFC, and how you can add this tool to your repertoire for
game development.
WFC is a very popular procedural generation technique that can generate unique outputs of tilemaps or levels based off prompted input
images or tiles. WFC is an implementation of the model synthesis algorithm. WFC was created by Maxim Gumin in 2016. The WFC algorithm
is VERY similar to the model synthesis algorithm developed in 2007 by Paul Merrell. For more information on WFC specifically, you can
review Maxim's Github repo here.
It is based off the theory from quantum mechanics. Its application in Game Development though is a bit simpler. Based on a set of input
tiles or input image, the algorithm can collapse pieces of the output down based on the relationship of that tile or image area.
Example input image:
(Yes I do have an unhealthy fascination with the original Final Fantasy)
Example output images:
Entropy
Digging into the quantum mechanics context of WFC will introduce us to the term Entropy. Entropy is used as a term that describes the
state of disorder. The way we will use it today is the number of different tile options a certain tile can be given the state of its
neighbor tiles. We will demonstrate this further down.
The concept essentially states that the algorithm selects the region of the output image with the lowest possible options, collapses it
down to its lowest state, then using that, propogating the rules to each of the neighbor tiles, thus limiting what they can be. The
algorithm continues to iterate and collapsing down tiles until all tiles are selected. The rules are the meat and potatoes of the
algorithm. When you setup the algorithm's run, you not only provide the tileset, but also the rules for what tiles can be
For this discussion, as the demo application focuses on using WFC with the ExcaliburJS game engine, we are focusing on the simple
tile-based WFC approach.
The rules are arguably the most critical aspect of the algorithm. For the simple tile-based mapping, this includes details and mappings
between each tile and what other tiles can be used as neighbors. If you were doing the input image form of WFC, the input image's
design would dictate the rules pixel by pixel.
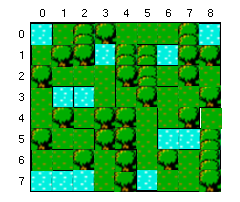
Let us consider this subsection of the tilemap to demonstrate this:
Let's identify each tile as tree, treetop, water, road, and grass. For the sake of simplicity, we will focus on just four of them:
tree,water, grass, and treetop.
We will define some rules for the tiles as such.
ts
let treeTileRules = {
up: [treeTopTile, grassTile, waterTile],
down: [grassTile, waterTile, treeTile],
left: [grassTile, waterTile, treeTile],
right: [grassTile, waterTile, treeTile],
};
let grassTileRules = {
up: [treeTile, grassTile, waterTile],
down: [grassTile, waterTile, treeTile],
left: [grassTile, waterTile, treeTile],
right: [grassTile, waterTile, treeTile],
};
let treeTopTileRules = {
up: [grassTile, waterTile, treeTopTile],
down: [treeTile],
left: [grassTile, waterTile, treeTile],
right: [grassTile, waterTile, treeTile],
};
let waterTileRules = {
up: [treeTile, grassTile, waterTile],
down: [grassTile, waterTile, treeTile],
left: [grassTile, waterTile, treeTile],
right: [grassTile, waterTile, treeTile],
};
What these objects spell out is that for tiles above the tree tile, it can be a grass, water, or treetop tile. Tiles below the treetile
can be another tree tile, or water, or grass... and so on. One special assignement to note, that below a treeTop tile, can ONLY be a
treeTile.
We can proceed to follow this pattern for each of the tiles, outlining for each tile what the 4 neighbor tiles CAN be if selected.
The process purely starts out with an empty grid... or you actually can predetermine some portions of the grid for the algorithm to
build around... but for this explanation, empty:
Given that none of the tiles have been selected yet, we can describe the entropy of each tile as essentially Infinite, or more
accurate, N number of available tiles to choose from. i.e. , if there are 5 types of available tiles, then the highest entropy
is 5, and each tile in this grid is assigned that entropy value.
If we entered the algorithm with predetermined tiles, or what we could call collapsed, then the entropy of the surrounding neighbors of
those tiles would have a lower entropy as dictated by the rules we discussed above.
Let's begin by selecting a random tile on this grid... {x: 3,y: 4}. Due to the fact that all its neighbors are empty, it's pool of
available tiles is 4, tree, grass,water, or tree top. Let us pick tree, as this can simply be randomly picked from the set.
This leads us into the idea of looping through all the tiles and setting their entropy value based on what their neighbors are... we
have 4 available tiles for this experiment, so 4 will be the highest entropy value.
Take note that the neighbors of our fully collapsed tile are not at entropy 4, but at 3, as for each of these neighbors, our 'rules'
for the tree tile reduces their possible options. So now we start the process again, but instead of randomly selecting any tile, we
will form a list of the lowest entropy tiles, and that becomes our available pool. So, in this example:
[{x:3,y:3}, {x:2,y:4}, {x:4, y:4}, {x:3,y:5}] all have entropy values of 3, so they are what we select.
4,4 is selected from that pool, and based on the rules, it can be grass, water, or tree. Randomly selected: tree again. Looping through
the tiles and resetting the entropy, we get a new pool of tiles.
4,3 is the next selected from the new pool of lowest entropy tiles, and it becomes a grass tile. Looping through the tiles and
resetting entropy, we notice something different.
We see our first shift in the pool of lowest entropy. The reason behind tile 3,3 being entropy level 2 is due to the rules of grass and
tree tiles.
ts
let treeTileRules = {
up: [treeTopTile, grassTile, waterTile],
down: [grassTile, waterTile, treeTile],
left: [grassTile, waterTile, treeTile],
right: [grassTile, waterTile, treeTile],
};
let grassTileRules = {
up: [treeTile, grassTile, waterTile],
down: [grassTile, waterTile, treeTile],
left: [grassTile, waterTile, treeTile],
right: [grassTile, waterTile, treeTile],
};
The left field for grass tiles allows for grass, water, and tree... while the up field for tree only allows grass, water, and treetop.
So between those two fields, there are only 2 tile types that match both requirements, thus there are only 2 available tiles to select
and now and entropy of 2.
The next iteration of the algorithm has only one tile in its pool of lowest entropy, 3,3 so it gets collapsed to either water or grass
based on its neighbors, so it becomes grass as a random selection.
This algorithm carries on until there are no more tiles to collapse
One note on this example is that we have really limited the amount of different tiles that are being accessed, and you see this
manifest itself in the entoropies of 3,4 consistently. The rules also are fairly permissive, which is why we don't see a huge variation
of entropies. More tiles available, and more restrictive rules, will drive much more variation in the entropy scores that will be
witnessed.
What you will find with this algorithm that there maybe created a conflict where there is no available tiles to select based on the
neighbors. This is called either a conflict or a collision, and can be handled in a couple different ways.
One thought is to reset the map and try again. From a process perspective, sometimes this is just the easiest/cheapest method to
resolve the conflict.
Another approach is to use a form of the command design pattern, and saving a stack of state snapshots that are captured during each
step of the algorithms iteration, and upon reaching a collision, 'backtrack' a bit and retry and generate again from a previous point.
The command design pattern essentially unlocks the undo button for an algorithm, and allows for this.
The demo application that's online is a simple, quick simulation that runs a few algorithm iterations... and can regenerate the
simulation on Spacebar or Mouse/Touch tap.
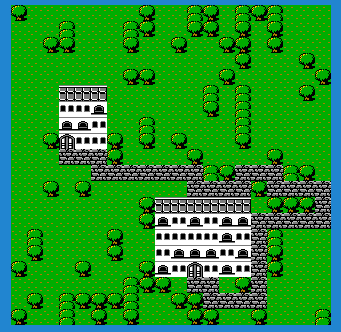
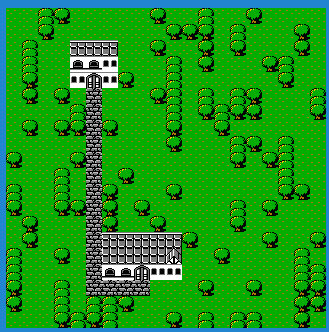
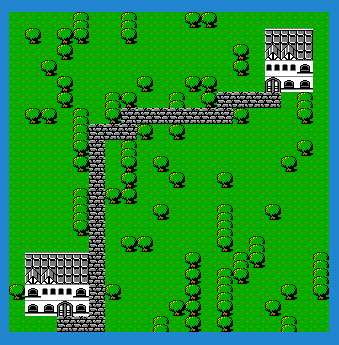
First, it uses WFC to generate the terrain, only using the three tiles of grass, tree, treetops.
Second, it finds spots to draw two buildings. The rules around this is to not collide the two buildings, and also not have the
buildings overrun the edges of the map. I use WFC to generate random building patterns using a number of tiles.
Finally, and this has nothing to do with WFC, I use a pathfinding algorithm I wrote to find a path between the two doors of the houses,and draw a road between them... I did that for my own amusement.
Pressing the spacebar in the demo, or a mouse tap, attempts to regenerate another drawing. Now, not every generation is
perfect, but this seems to have a >90% success rate, and for the purposes of this article, I can accept that. I intentionally did not
put in a layer of complexity for managing collisions, as I wanted to demonstrate what CAN happen using this method, and how one needs
to account for that in their output validation.
Why Excalibur
Small Plug...
ExcaliburJS is a friendly, TypeScript 2D game engine that can produce games for the web. It is free and
open source (FOSS), well documented, and has a growing, healthy community of gamedevs working with it and supporting each other. There
is a great discord channel for it HERE, for questions and inquiries. Check it out!!!
Conclusions
Wrapping up, my goal was to help demystify the algorithm of Wave Function Collapse. There are some twists to the pattern, but overall
it is not the most complicated of generation processes.
We also discussed the concept of Entropy, and how it applies to the algorithm overall, in essence it helps prioritize the next tile to
be collapsed. Collapsing a tile is simply the process of picking from of available tiles that a specific tile CAN be by means of the
rules provided.
In my experience, and I've done a few WFC projects, the rules provide the constraints of the algorithm. Ultimately, it is where I
always spend the most time tweaking and adjusting the project. Too tight of rules, and you'll need to be VERY good at managing
collisions. However, too few rules, and you're output maybe a very noisy mess.
I suggest you give WFC a try, it can be VERY fun and rewarding to see the unique solutions it can come up with.
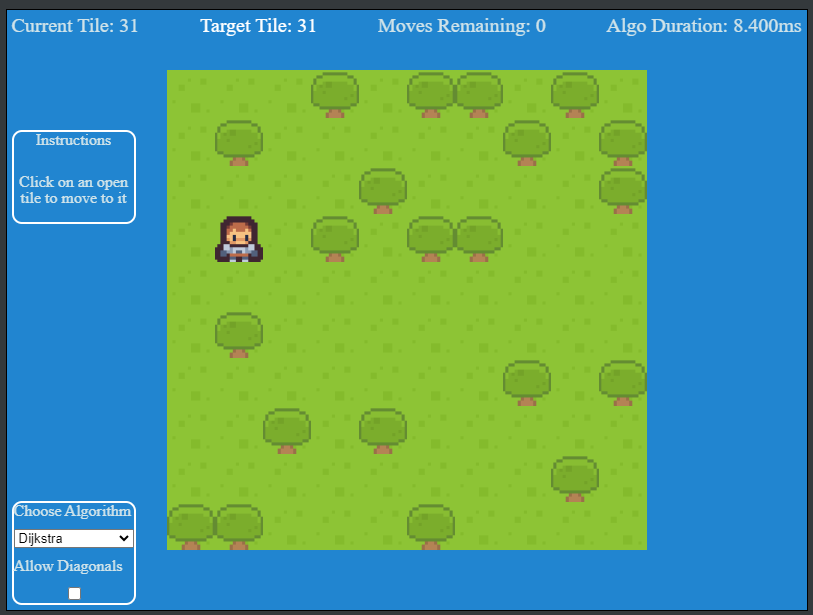
This is a continuation of our discussion on pathfinding. In the first part of our discussion, we investigated Dijkstra's algorithm.
This time, we are digging into A* pathfinding.
Quick research on pathfinding gives a plethora of resources discussing it. Pathfinding is calculating the shortest path through some
'network'. That network can be tiles on a game level, it could be roads across the country, it could be aisles and desks in an office,
etc. etc.
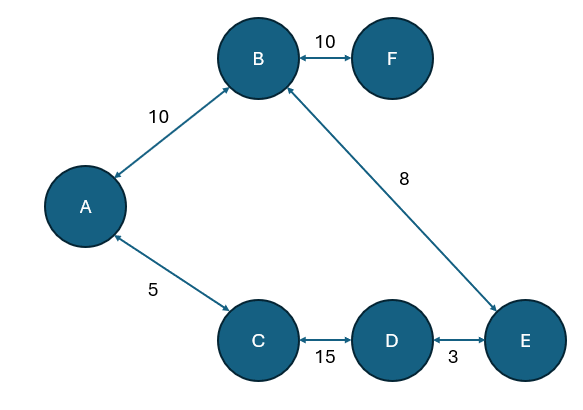
Pathfinding is also an algorithm tool to calculate the shortest path through a graph network. A graph network is a series of nodes and
edges to form a chart. For more information on this: click here.
For the sake of clarity, there are two algorithms we specifically dig into with this demonstration: Dijkstra's Algorithm and A*. We
studied Dijkstra's Algorithm in Part 1.
A star is an algorithm for finding the shortest path through a graph that presents weighting (distances) between different nodes. The
algorithm requires a starting node, and an ending node, and the algorithm uses a few metrics for each node to systematically find the
shortest path. The properties of each node are fCost, gCost, and hCost. We will cover those in a bit.
The A* algorithm was originated in its first state as a part of the Shakey project. That project was about designing a robot that
could calculate its own path and own actions. In 1968, the first publishing of the A* project happened and it describes its initial
heuristic function for calculating node costs.
A heuristic function is a logical means, not necessarily perfect means, of solving a problem in a pragmatic way.
Over the years the A* algorithm has been refined slightly to become more optimized.
We first load our graph, understanding which nodes are clear to traverse, and which nodes are blocked. We also need to understand the
starting node and ending node as well.
We first will assess the cost properties for each node. Cost is a term we are using that represents a distance between nodes. This will
be a method that assigns the fCost, gCost, and hCost to each node.
Let's discuss these costs first. The costs are a weighting of each node with respect to its positioning between the starting and ending
nodes.
The fCost of a tile is equal to the gCost plus the hCost. This is represented as such:
f=g+h
The gCost of the node is the distance cost between the current node and the starting node.
The hCost of the node is the 'theoretical' distance from the current node to the ending node. This is why we discussed heuristics
earlier. This value is an estimate of the distance, a best guess. This makes guessing for a rectangular tilemap easy, since all tiles
are distance 1 from each other in a grid, the method of guessing is just using the tile positions of the two nodes and using
Pythagorean theorem to assess the distance. If the grid is irregular, some spatial data may need to be injected into the graphs
creation to facilitate this heuristic, for example: x/y coordinate locations maybe.
Thus, the fCost is the sum of these two values. While simplistic, this is the value that is leveraged in the algorithm to determine the
'best' path.
After we've looped through all the nodes and costed them appropriately, we will utilize a buffer called openNodes. We will push the
starting node into this, as it is the only node we 'know' about as of yet. We will use this openNodes buffer for much of the iterations
we conduct in this algorithm.
We will leverage another buffer we will call either 'checked' or 'closed' buffer, and this is where the results of our algorithm will
exist, as we process tiles from openNodes into this buffer.
Then we get into the repeating part of the algorithm.
Look for the lowest F cost square in the open list. Make it the current square.
Move the current square to the closed buffer (list). Remove from openNodes, move to 'checked' nodes.
Check if the new current node is the endnode, this is the finishing condition. using the parent node properties of each node, walk
backwards to the starting node, that's the shortest path
If not ending node, review all neighbor squares of current square, if a neighbor is not traversable, ignore it
Check each neighbor is in checked/closed list of nodes, if not, perform parent assignment, and add to open node list
This series continues to iterate while neighbors are being added to the open node list.
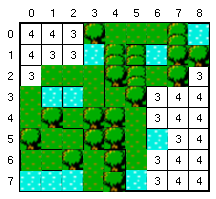
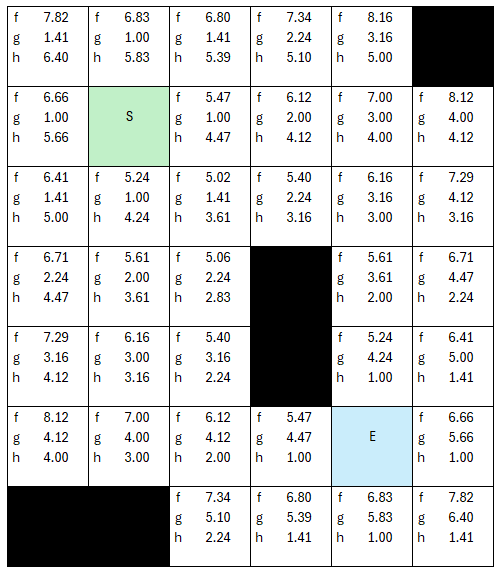
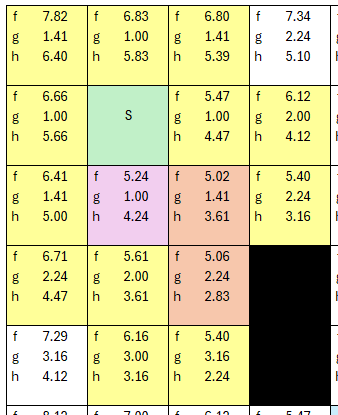
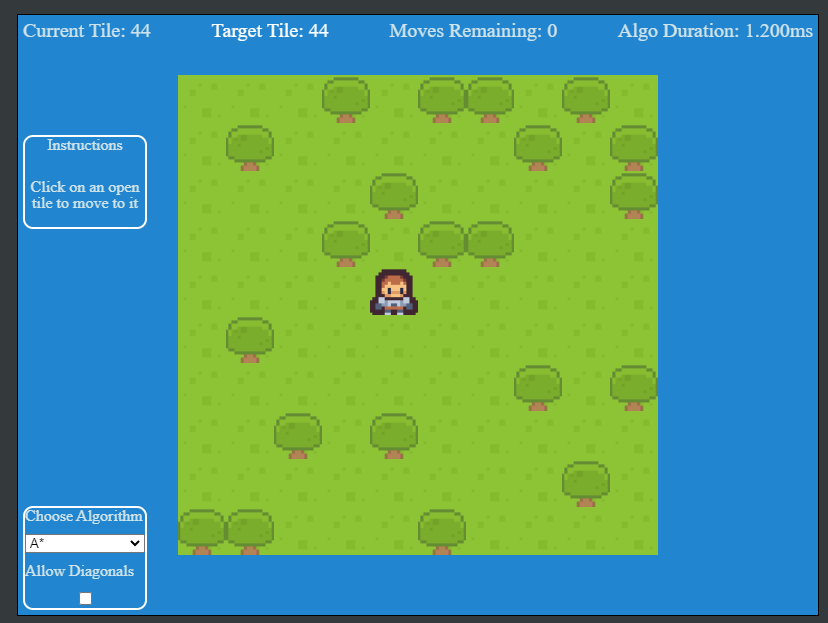
We will manage our walkthrough with two different lists, open nodes and checked nodes. Black tiles above represent nodes that are not
traversable. Let's define our start and stop nodes as indicated by the green S node and the blue E node.
The first step of A* algorithm is costing all the nodes, and let's see if we can show this easily.
For more clarity on the 'costing' step, let's talk through the core loop that is applied to each tile.
My process is to loop through each tile, and assuming it has either coordinates or and index, I can determine its distance from the
start node and end node.
Let's do the first tile together. The first tile is coordinates (x:0, y:0), and the start node is coordinates (x: 1, y:1), while the
end node is (x: 4,y:5). The gCost for this tile we can use Pythagorean theorem to calculate the distance as the hypotenuse.
Knowing both now, we can determine the fCost of that node or tile, by adding the two together, making the fCost 7.82... with rounding.
We can repeat this process for each tile in the graph.
Why am I using floating point values here? There's a reason, if I simply use integers, then the distances wouldn't have enough
resolution in digits, creating a little more unoptimized iterations, as the number of cells with equal f Costs would increase, here the
fCosts are more absolute, and we will reduce the iterations. Simply put, if all the fCosts between 5.02 - 5.98 all are represented as 5
as an integer, it muddies up how the algorithm moves through and prioritizes the 'next' cell to visit. With floating points, this is
explicit. Being a grid, all the distances are simple hypotenuse calculations using Pythagorean theorem.
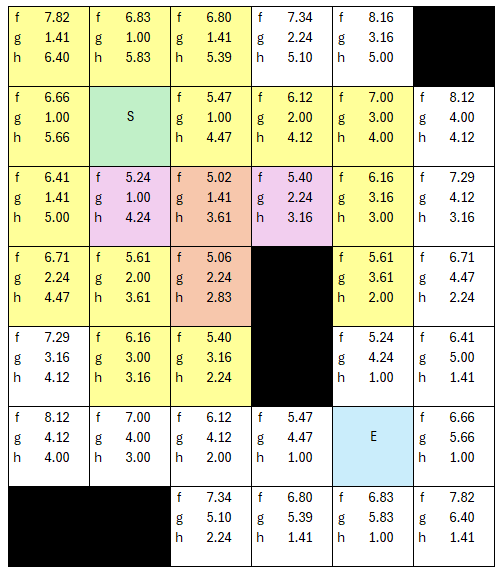
Before we jump into the overall repetitive loop, we will add the startnode into our list of opennodes.
Now the algorithm can start to be repetitive. We set the startnode to the current node, and move it from open to checked lists.
We first check if our current node is the end node, which it is not, so we proceed.
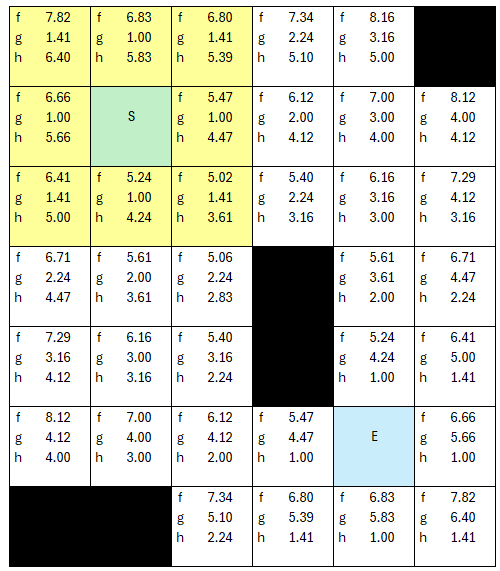
The next step is to select the lowest fCost, and since the starting node is the only node in openlist, it gets selected, otherwise we
would have selected randomly from the lowest value fCosts in the open node list. Now we look at all the neighbors. I will designate the
pale yellow as our 'open node' list. We will use different colors for 'checked'.
None are in the checked list, so we add them all to the opennodes list, and assign the current node as each nodes parent. To note, if a
node is not traversable (black) then it gets ignored at this point, and not added to the list.
This then repeats as long as nodes are in the open node list, if we run out of open nodes without hitting the end node, then there's no
path. When we hit the end node, we start building our return list by looping back through the parent nodes of each node. Starting at
the end node, it will have a parent, that parent will have a parent... and so on until you hit the start node.
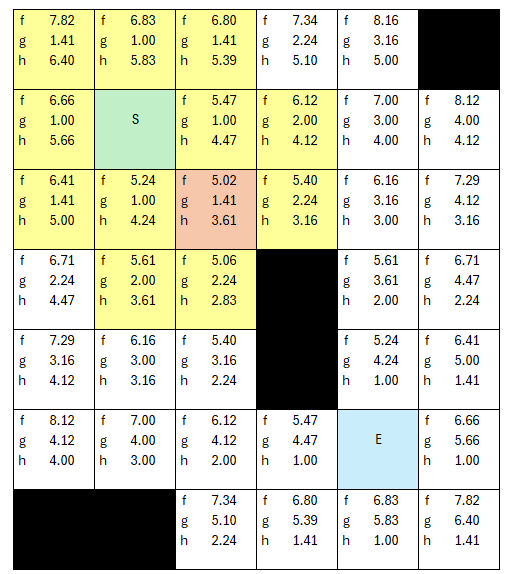
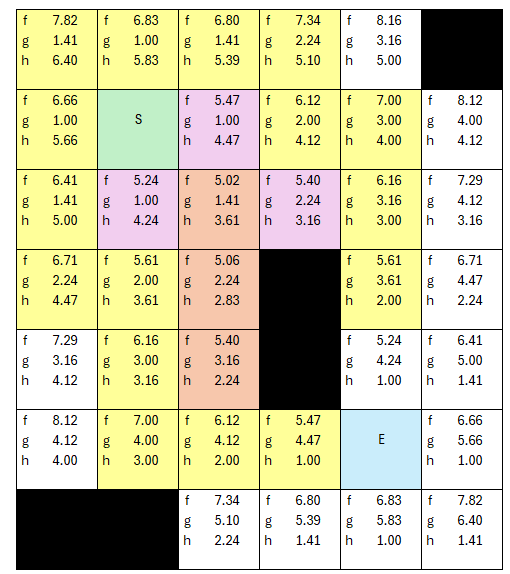
Let's walk through the example. Let's pick a tile with lowest f cost. As we select new 'current' nodes, we move that node to our
checked list so it no longer is in the open node pool.
The lowest cost is 5.02, and grab its neighbors. Along the way we are assigning parent nodes, and adding the new neighbors to the
openNodes list.
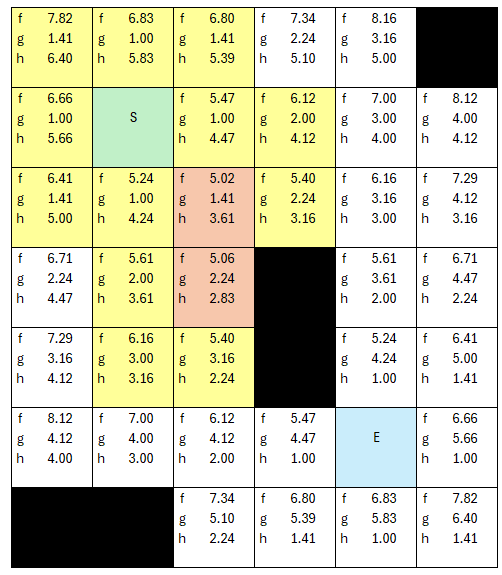
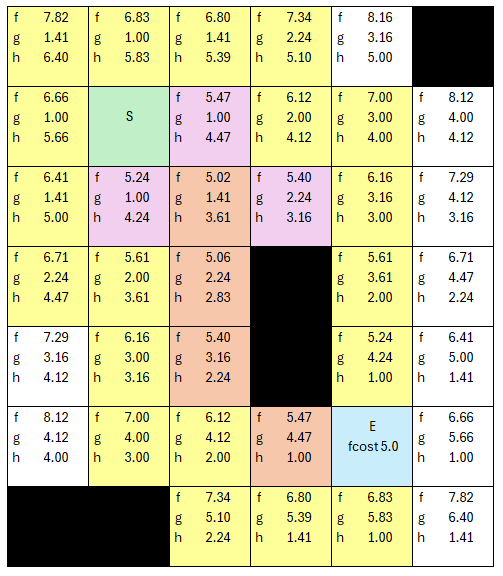
...but we keep selecting lowest cost node ( f cost of 5.06 is now the lowest to this point), we add neighers to opennodes, assign them
parent nodes...
.. the next iteration, the fCost of 5.24 is now lowest, so it gets 'checked', and we grab its neighbors, assign parents..
.. the next iteration, there are two nodes of 5.4 cost, so let's see how this CAN play out, and the algorithm starts to make sense at
this point.
Let's pick the high road...
The new neighbors are assigned parents, and are added to the overall list of open nodes to assess. Which is the new lowest fCost now?
5.4 is still the lowest fCost.
Yes, the algorithm went back to the other path and found a better next 'current' node in the list of open nodes. The process is almost
complete. The next lowest fCost is 5.47, and there is more than one node with that value, so for the sake of being a completionist...
Still the lowest fCost is 5.47, so we select the next node, grab neighbors, assign parents... one thing I did differently on this table
is showing the fCost of the ending node, which up till now wasn't necessary, but showing it here lets one understand how the overall
algorithm loops, because the end node HAS to be selected as the next lowest cost node, because the check for end node is at the
beginning of the iteration, not in the neighbor eveluation. So in this next loop, I don't make it yellow, but the end node is now been
placed AS A NEIGHBOR into the list of open nodes for evaluation.
We now have our path, because the next iteration, the first thing we'll do is pick the lowest node fCost (5.0) and make it the current
tile, and then test if it is the end node, which is true now.
We can return its path walking back all the parent node properties and see how we got there along the way.
The demo is a simple example of using a Excalibur Tilemap and the pathfinding plugin. When the player clicks a tile that does NOT have
a tree on it, the pathfinding algorithm selected is used to calculate the path. Displayed in the demo is the amount of tiles to
traverse, and the overall duration of the process required to make the calculation.
Also included, are the ability to add diagonal traversals in the graph. Which simply modifies the graph created with extra edges added,
please note, diagonal traversal is slightly more expensive than straight up/down, left/right traversal.
ExcaliburJS is a friendly, TypeScript 2D game engine that can produce games for the web. It is free and
open source (FOSS), well documented, and has a growing, healthy community of gamedevs working with it and supporting each other. There
is a great discord channel for it HERE, for questions and inquiries. Check it out!!!
For this article, we briefly reviewed the history of the A* algorithm, we walked throught the steps of the algorithm, and then applied
it to an example graph network.
This algorithm I have found is faster than Dijkstra's Algorithm, but it can be tricky if you're not using a nice grid layout. The trick
comes into the 'guessing' heuristic of the distance between the current node and the endnode (hCost). If you using a grid, you can use
the coordinates of each node and calculate the hypotenuse as the hCost. If it is an unorganized, non standard shaped graph network,
this becomes trickier. For the moment, for the library I created, I am limiting A* to grid based tilemaps to make this much simpler. If the
grid is not simple, I use Dijkstra's algorithm.
One of the most common problems that need solved in game development is navigating from one tile to a separate tile somewhere else. Or
sometimes, I need just to understand if that path is clear between one tile and another. Sometimes you can have a graph node tree, and
need to understand the cheapest decision. These are the kinds of challenges where one could use a pathfinding algorithm to solve.
Quick research on pathfinding gives a plethora of resources discussing it. Pathfinding is calculating the shortest path through some
'network'. That network can be tiles on a game level, it could be roads across the country, it could be aisles and desks in an office,
etc etc.
Pathfinding is also an algorithm tool to calculate the shortest path through a graph network. A graph network is a series of nodes and
edges to form a chart. For more information on this: click here
For the sake of clarity, there are two algorithms we specifically dig into with this demonstration: Dijkstra's Algorithm and A*.
Dijkstra's Algorithm is a formula for finding the shortest path through a graph that presents weighting (distances) between
different nodes. The algorithm essentially dictates a starting node, then it systematically calculates the distance to all other nodes
in the graph, thus, giving one the ability to find the shortest path.
Edsger Dijkstra, was sipping coffee at a cafe in Amtserdam in 1956, and was working through a mental exercise regarding
how to get from Roggerdam to Groningen. Over the course of 20 minutes, he figured out the algorithm. In 1959, it was formally
published.
Let's start with this example graph network. We will manage our walkthrough using a results table and two lists, one for unvisited
nodes, and one for visited nodes.
Let's declare A our starting node and update our results object with this current information. Since we are starting at node A, we then
review A's connected neighbors, in this example its nodes B and C.
Knowing that B is distance 10 from A, and that C is distance 5 from A, we can update our results chart with the current information.
With that update, we can move node A from unvisited to visited list, and we have this new state.
Now the algorithm can start to be recursive. We identify the node with the smallest distance to A of our unvisited nodes. In this
instance, that is node C.
Now that we are evaluating C, we start with identifying its unvisited neighbors, which in this case is only node D. The algorithm would
update all the unvisited neighbors with their distance, adding it to the cumulative amount traveled from A to this point. So with that,
D has a distance of 15 from C, and we'll add that to the 5 from A to C.
We continue to repeat this algorithm until we have visited all nodes.
From here we will quickly loop through the rest of the table.
This is when we visit node C:
Node B is closer to Source than node D, so we visit it next.
Unvisited neighbors of B are E and F. E is closes to A, so we visit it next.
D is E's unvisited neighbor, but its distance via E is longer than what's already in the result index, so we do not add this data up.
D is the only unvisited neighbor, and we hit a dead end on this branch, so D gets visited, but with no updates to the results table
So since we are looping through all unvisited Nodes, F is the final unvisited node, and its a neighbor of B. We can now visit F through
B, and we do not have any results table updates with this visit, as F has no unvisited neighbors.
The demo is a simple example of using a Excalibur Tilemap and the pathfinding plugin. When the player clicks a tile that does NOT have
a tree on it, the pathfinding algorithm selected is used to calculate the path. Displayed in the demo is the amount of tiles to
traverse, and the overall duration of the process required to make the calculation.
Also included, are the ability to add diagonal traversals in the graph. Which simply modifies the graph created with extra edges added,
please note, diagonal traversal is slightly more expensive than straight up/down, left/right traversal.
In this article, we reviewed a brief history of Dijkstra's Algorithm, then we created and example graph network and stepped through it
using the algorithm, and then was able to use it to determine the shortest path of nodes.
This algorithm I have found is more expensive than A*, but is a nice tool to use when you don't understand the shape and size of the
graph network. As a programming exercise, I had a lot of fun interating on this problem till I got it working, and it felt like an
intermediate coding problem to tackle.
I have been in need of an AI system that can execute a simulation that I desire to run. In my research, I have come across
Goal-Oriented Action Planning. This technique can give me the flexibility I need to run my simulation, let's dive into the
implementation a bit.
Goal-Oriented Action Planning, or GOAP, is a flexible AI technique that enables the developer build up a set of actions and objectives,
and allows the NPC (agent) itself determine what the best objective is, and how to accomplish said objective.
GOAP includes the use of Agents, Goals, Actions, and State, to plan out its next series of decisions and activities. This is a useful
system for Non-Playable Characters(NPCs) or enemy AI logic.
State is the data set conditions that describes the world in which an agent exists. For my implementation, an established set of
key/value pair data was used to fuel the simulation. A simple example of a world state:
ts
world = {
trees: 3;
bears: 1;
playerPosition: {x: 100, y:200};
};
ts
world = {
trees: 3;
bears: 1;
playerPosition: {x: 100, y:200};
};
This is the data that gets used, not only as a starting point, but gets cloned and mutated over the course of the algorithm processing
the plan.
Next, let us review the goals or objectives that are intended to be accomplished. The goal defines the target state that the algorithm
evaluates against to determine if the objectives are met.
The goal assessment will take a copy of the mutated state and compare it against the target state defined for the goal, and if it
matches, let's the algorithm know that is done with that branch of evaluation.
The goal also contains a method of assessing its own priority conditions, which takes in the world state and returns a defined factor
of prioritization. For example, a floating-point value from 0.0 to 1.0, where 1.0 is the highest priority.
Agencts are the entities (enemies or other NPCs) that get the planning system attached to it. If the entity is not currently executing
a plan, it can call the planning process to assess what it should do next.
One aspect of the agents that is important to remember, is including the ability to cancel the plan, and reassess, even if the sequence
isn't complete.
Think about if the environment in which the current plan was created, no longer is viable, you need to be able to change your mind.
i.e. a power up is no longer available, or a targeted enemy is dead, etc...
These actions should have a cost component, time or energy is common, and the actions will be linked together to form a sequence of
actions that constitutes 'plan'.
What is unique about components of an action beyond cost, is the precondition and effect components. These are super important.
The precondition component is what the planner evaluates if the action is viable under the current condition. The current condition is
the cloned, mutated state that is considered for that sequence of the plan.
If the conditions are true for the precondition, then the action is considered an available choice for the next step.
The effect component of an action is the defined changes to state that occur when that action is executed. This is used by the planner
to clone and mutate the state as it churns through the different possible options.
The planner is the algorithm which generates the plan, and it has several tasks. To use the Planner, you pass the current world state,
all available actions for the agent, all available goals for the agent.
The planner's first task is to assess all available goals for the agent to determine which is the highest priority.
Then, with that goal selected and the current world state, find a list of actions that can be executed.
With your state, your goal, and your available actions, you can start building a graph network, a branching tree of available plans.
When the graph is constructed, the planner can assess the best course of action based on any number of custom factors, and returns the
sequence of actions as the plan.
The graph network is built with a recursion that forms a tree structure, and branching is based on the new available list of actions
that meet the mutated state condition, for that branch.
As you walk through each branch, the actions taken at each node will mutate the state. That mutated stated then gets checked against
the goal provided, to see if you are done.
If the goal passes, an endnode is created. If not, then that newly mutated state is used to generate the new list of available actions
and the recursion continues.
The recursion ends when a branch's mutated state cannot create further list of actions, or the goal is met.
Once the graph is assembled, you can filter out any branches that do not end in a completed goal, then the Planner can assess which
path makes most sense.
This is where you can have different style planners. The planner i created simply creates a 'cheapest cost' plan based on the the
aggregate cost of each plan created.
I use a dijkstra's algorithm to calculate, based on each actions 'cost', the
cheapest path to execute.
But there is flexibility here as well, including using different costing structures, maybe you want to balance energy and time both?
Then you could construct a planner that favors one over the other based on conditions.
I spent a couple weeks building a simulation of my GOAP library that I created. It is a simple "actor feeds fire with wood, while
avoiding bears" simulation.
The Actor has two goals, "keep fire aive", and "avoid bear"
If the actor is currently without a plan to execute, it passes its worldstate into the planner. The world state looks vaguely like
this:
ts
exportconstworld= {
tree: 500,
tree2: 500,
tree3: 500,
campfire: 0,
player: 0,
playerState: playerState.idle,
bearDistance: 300,
};
ts
exportconstworld= {
tree: 500,
tree2: 500,
tree3: 500,
campfire: 0,
player: 0,
playerState: playerState.idle,
bearDistance: 300,
};
The actions available are:
ts
player.goapActions = [
feedFireAction,
collectWoodAction,
moveToTreeAction,
moveToFireAction,
moveToTree2Action,
collectWood2Action,
moveToTree3Action,
collectWood3Action,
runAwayAction,
relaxAction,
];
ts
player.goapActions = [
feedFireAction,
collectWoodAction,
moveToTreeAction,
moveToFireAction,
moveToTree2Action,
collectWood2Action,
moveToTree3Action,
collectWood3Action,
runAwayAction,
relaxAction,
];
When the planner is fed these components, it assesses the priority of each action based on their weighting, is the fire getting low? or
is the bear close by?
With the goal selected, it uses the state data to determine which actions to take, for the fire building, the first round of actions
usually are moving to trees. That is unless the player is holding some wood, then it will decide to just go to the fire directly.
If the player moves to a tree, it then collects its wood, then it moves to fire, and feeds the fire, and it waits till the fire gets
lower before going to collect more wood.
I mentioned earlier that agents have to be able to cancel their plans. If the bear comes close to the player, it triggers a
cancelPlan() method and the player is forced to generate a new plan.
Since the bear is close, it picks "avoid bear" plan, and then the process starts again with that new goal.
We have covered GOAP, some history of it, what the components of a GOAP system are, and how to implement them.
What I have learned in this process is that GOAP is very powerful and flexible. That does not imply that GOAP is easy, I would consider
implementing a GOAP system at the intermediate level.
When trying to connect different actions and insuring they chain together to form a complete plan, there are many chances in
implementation to create issues. But when dialed in, GOAP can provide a foundation for a very flexible AI system that can lead to
enriching gameplay.
The Excalibur team has built a number of games over the years. During our last few game jams, we started paper prototyping soon after our brainstorming process. It’s been working great and we highly recommend giving it a try!
Changing rules or mechanics that only exist on paper is a lot faster than having to adjust any code you may have written for those changes. It’s possible to alter your game without much worry, because you’re operating primarily in the realm of imagination, rather than within the constraints of your software development environment.
Paper prototyping can also help avoid the “sunk-cost fallacy”, which encourages you to stick with whatever you’ve spent a lot of time on just because you’ve spent a lot of time on it. Instead, you can change as much or as little as you wish without having to worry about deleting a bunch of code that you’ve already written.
You also have the opportunity to fix game design problems before you've devoted time to implementing them in the actual software. While we were paper prototyping Sweep Stacks, we uncovered a game design complication with how the board filled up over time. Without having to write any code, we were able to determine a solution for the issue and implement it directly when we started programming the game.
If you’ve spent time prototyping, you'll have a more concrete idea of what you want your game to be. When you actually start writing code, you can begin with a more specific idea of what you want to accomplish. We’ve found it’s much easier to visualize and architect our code when we have a clear idea of how the rules and systems of a game will work together.
While it's called “paper prototyping”, this process doesn't literally have to be done with paper, or any physical components at all. Virtual paper prototyping can be just as effective, and allows you to collaborate more easily with remote teammates. There are plenty of wireframing and “virtual tabletop” web apps out there that you can use to put together a digital prototype for your game (we usually use Excalidraw).
The next time you’re working on a game, try doing some prototyping before you write any code. Adjust your rules, modify your designs, and dream of what you want to build.
Updated to the latest Excalibur, Capacitor.js & Parcel!
In this post we put a web canvas game built in Excalibur into an Android (or iOS) app with Capacitor.js!
In the past I would have used something like Cordova, but this new thing from the folks at Ionic has TypeScript support out of the box for their native APIs and support for using any Cordova plugins you might miss.
The capacitor project setup is pretty straightforward from their docs, it can drop in place in an existing project or create a brand new project from scratch.
I opted for the brand new project:
> npm init @capacitor/app
> npm init @capacitor/app
Then follow their wizard and instructions to configure.
After that step add the platforms you're interested in, in this case Android
> npx cap add android
> npx cap add android
I recommend reading the capacitor documentation on workflow with a hybrid native app. The gist is this
Run npx cap sync to copy your web project into capacitor
Run npx cap run android to start the project on android (or start in the Android SDK)
Now that we have Android all setup we can start the app with the capacitor command line.
The gist is that it copies the final compiled html/css/js assets from your favorite frontend frameworks and build tools into the native container
> npx cap sync
> npx cap sync
After that we can open it in Android Studio with the capacitor commandline
> npx cap open android
> npx cap open android
Building the project and running the first time can take some time, so be patient after hitting the big green play button.
ProTipTMThe Emulator is MEGA slow to start so once you get it on, leave it on. You can redeploy the app to a running emulator with the "re-run" hightlighted below.
If your Android emulator crashes on the first try like mine did with something like The emulator process for AVD Pixel_3a_API_30_x86 was killed, this youtube video was super helpful. For me the problem was disk space, the AVD needs 7GBs of disk space to start so I had to clean out some junk on the laptop 😅
The dev cycle is pretty slick, run npm cap copy android to move your built JS living in the www to the right android folder. The default app looks like this after running it in the android emulator.
First let's setup our TypeScript by installing and creating an empty tsconfig.json
> npm install typescript --save-dev --save-exact
> npx tsc --init`
> npm install typescript --save-dev --save-exact
> npx tsc --init`
Recently I've been a big fan of parcel(v1) for quick and easy project setup, and it works great with excalibur also webpack is cool too if you need more direct control of your js bundling.
> npm install parcel --save-dev --save-exact
> npm install parcel --save-dev --save-exact
I copied the generated manifest.json, index.html, and css/ folder out of the original generated www/ and put it into game/.
We need to setup our development and final build script in the package.json. The npm "start" script tells parcel to run a dev server and use game/index.html as our entry point to the app and follow the links and build them (notice the magic inline <script type="module" src="./main.ts"></script>) ✨
In this setup I'm sending all my built output with --dist-dir into the www directory, which is what capacitor will copy to android. I went ahead and deleted the provided default app in the www directory.
Using the Excalibur engine with capacitor and parcel will be a breeze! Really any web based game engine could be substituted here if you want. Here is the source on github!
// Original asset is at a 45 degree angle need to adjust
actor.rotation = delta.toAngle() +Math.PI/4;
});
constactor=newActor({
x: game.halfDrawWidth,
y: game.halfDrawHeight,
width: 40,
height: 40
});
actor.graphics.use(sword.toSprite());
game.add(actor);
});
Note, depending on your emulator settings you may need to tweak it's graphics settings and restart Android Studio for it to build and run (This works out of the box fine on real hardware tested in BrowserStack, for some reason the emulator graphics can be confused)
After the winter break, the team has released [email protected] with a lot of improvements to the core engine and plugins! Check the roadmap for our current plans.
Debugging why things aren't working has historically been pretty difficult. This plugin will greatly assist in the game development cycle. Nearly everything is available and configurable.
The Tiled plugin now implicitly adds a z-index to each layer (which can be overridden) which means things will look as you expect in Excalibur as they do in the Tiled editor.
Set the starting layer z (defaults to -1) and get gaming!
When v0.25.0 was released, it was a "monolithic" renderer design, meaning everything Excalibur could possibly draw was built into a single renderer and shader program. This became onerous fairly quickly. And as the old adage goes: "you don't know how to build something until you've built it twice".
With v0.25.2, each type of drawing is split internally into separate renderer plugins. While this does come with some overhead when switching shader programs, it's worth it for the the simplicity, maintainability, and extensibility benefits.
Excalibur now allows you the ability to control the WebGL image filtering mode both implicitly and explicitly. Really this means Excalibur will try to pick a smart default, but allows overrides
Excalibur knows how to draw many types of graphics to the screen by default comes with those pre-installed into the ExcaliburGraphicsContext. However, you may have a unique requirement to provide custom WebGL commands into Excalibur, this can be done with a custom renderer plugin.
We've had a lot of community engagement this iteration, especially through the issues and github discussions. Lots of good issues, and lots of cool things in the show and tell
Big thanks to everyone who helped with this release:
We are progressing at full speed toward the v1 vision, there is still a lot to do but the end is in sight. Here are a few things that I'm personally really excited for:
Event system redo
Particle system refactor
Final deprecation of old drawing api
New TileMap enhancements for hexagonal and isometric maps
This was a point release, but despite that a lot of exciting things were added! Looking forward to v0.26.0!
After a year of work, a lot of great additions and improvements have made it into Excalibur, and we are making good progress towards our v1.0 release! Check the development roadmap for our current plans. It's hard to believe how different things are now since the first commit of Excalibur (back when it was called GameTS)!
Excalibur started as a tech demo in a presentation to show how powerful TypeScript can be. The engine has come so far since then, it's really amazing!
We are really excited to share this release with you! This release contains over 30 bug fixes and 50 new features! It's been a labor of love over the last year by many people, and we have some big features to share.
There is a combination of features (mentioned below) that resulted in big performance gains. Across the board, there's been a dramatic increase in what Excalibur can do in v0.25.0 vs v0.24.5.
In the gif below, we demonstrate the graphics performance specifically.
There is much better performance across the board with a higher baseline FPS in v0.25.0 for the same number of actors. You'll notice that FPS improves over time as more actors are offscreen in v0.25.0 compared to v0.24.5.
This benchmark was performed in the Chrome browser on a Surface Book 2 with the power plugged in.
We are adopting a similar versioning strategy to Angular, during pre-1.0. All plugins compatible with the core library will share the same prefix through the minor version. For example, if core Excalibur is [email protected], then the plugins that support that version are formatted like @excaliburjs/[email protected].
Excalibur DisplayModes have been refactored and renamed to clarify their utility.
FillContainer - Fill the game viewport to take up as much of the immediate parent as possible
FillScreen - Fill the game viewport to take up as much of the screen as possible
FitContainer - Fit the game maintaining aspect ratio into the immediate parent
FitScreen - Fit the game maintaining aspect ration into the screen
Fixed - Specify a static size for the game width/height
Refactor to Entity Component System (ECS) based architecture
The core plumbing of Excalibur has been refactored to use an ECS style architecture. However, developers using Excalibur do not need to know or care about the this underlying change to ECS if they don't want to.
What does ECS mean for Excalibur? At a high level, ECS architecture breaks down into three things:
Components contain data needed for various systems.
Systems implement the "behavior" by looping over entities that match a list of components.
For example, the graphics system processes all entities with a TransformComponent and a GraphicsComponent
Entities are the "holders" of components
Actor, Scene, and Engine remain as the familiar interface to build games; they're only implemented differently under-the-hood. The reason for the change was to break down ever-growing and complex logic that had accumulated in the Actor and Scene implementations into Components and Systems for maintainability. This change increases the flexibility of Excalibur, and allows you to add new novel behavior directly into the core loop with custom components ones if you desire.
Excalibur does not have the purest implementation of an ECS by design; our built-in components are more than just data. The built-in components do provide behavior, convenience features, and helper functions to maintain our core mission of keeping Excalibur easy to use. The Excalibur core team goal with ECS is flexibility and maintainability, not performance. If you wish, you can read more about our goals for ECS.
Here's A quick example of using the new ECS features:
The collision system has been significantly overhauled to improve the quality of the simulation and the stability of collisions. The core simulation loop "solver" has been redone to use an iterative impulse constraint solver, which provides a robust method of computing resolution that has improved performance and stability.
Collision intersection logic has now also been refactored to report multiple contact points at once. Multiple contacts improves the stability of stacks of colliders over single contact collisions (which can result in oscillations of boxes back and forth).
Colliding bodies can now optionally go to sleep. This relieves some of the pressure on the collision solver and improves the stability of the simulation by not moving these objects if they don't need to move. Colliders can be started asleep before a player in a game might interact with them
New CompositeColliders now make it possible to combine Excalibur Collider primitives (PolygonCollider, CircleCollider, and EdgeCollider) to make any arbitrary collision geometry. These new composite colliders power the new TileMap cell collisions and also power the new ex.Shape.Capsule(width, height) collider.
The Capsule collider is a useful geometry tool for making games with ramps or slightly jagged floors you want a character to glide over without getting stuck. This collider also helps with any "ghost collisions" that you might run into under certain conditions in your game.
CollisionGroups allow more granular control over what collides above and beyond collision type. Collsion groups allow you to create named groups of colliders like "player", "npc", or "enemy". With these groups, you can specify that players and enemies collide, player and npcs don't collide, and that npcs and enemies don't collide without needing to implement that logic in a collision event handler.
typescript
// Create a group for each distinct category of "collidable" in your game
The new Excalibur graphics system has been rebuilt from the ground up with speed in mind. It is now built on a WebGL foundation with a built-in batch renderer. This means that Excalibur will batch up draw commands and submit the minimum amount of draw calls to the machine when the screen is updated. This dramatically improves the draw performance and also the number of things wec can display on screen (as noted in the benchmarks earlier).
For drawing hooks the ExcaliburGraphicsContext is replacing the browser CanvasRenderingContext2D. If you still need to do some custom drawing using the CanvasRenderingContext2D the new Canvas graphic can help you out.
typescript
constcanvas=new ex.Canvas({
cache: true, // If true draw once until flagged dirty again, otherwise draw every time
draw: (ctx:CanvasRenderingContext2D) => {
ctx.fillStyle ='red';
ctx.fillRect(0, 0, 200, 200);
}
});
actor.graphics.use(canvas);
typescript
constcanvas=new ex.Canvas({
cache: true, // If true draw once until flagged dirty again, otherwise draw every time
Tiled is easily one of the best tools out there for building and designing levels for your game. It has certainly been a valuable tool in our toolbox. We have doubled down on our efforts to provide a first class Tiled integration with Excalibur via the excaliburjs/plugin-tiled. This work also involved a few improvements to the TileMap to improve it's graphics API and collision performance.
A lot of time was spent reviewing and improving our documentation. Part of this work was ensuring that the snippets don't go stale over time by building them in GitHub Actions.
Please check out the new and shiny doc site with new code examples at excaliburjs.com!
The Excalibur core repo now has WallabyJS enabled to improve the VS Code test development and debugging experience. Wallaby is a paid tool; because of that Excalibur will always also support the Karma based testing framework for official tests.
A useful update to excalibur-jasmine allows async matchers, which greatly simplifies checking image diffs in Jasmine unit tests.
typescript
it('should match images', async () => {
let engine =new ex.Engine({width: 100, height: 100});
A brand new integration test utility has been created called @excaliburjs/testing, which provides a quick way to drive Excalibur games with Puppeteer and do image-based snapshot testing.
typescript
// excalibur testing
test('An integration test', async (page) => {
// Check for the excalibur loaded page
awaitexpectLoaded();
// Compare game to expected an expected image
awaitexpectPage('Can check a page', './images/actual-page.png').toBe('./images/expected-page.png');
// Use puppeteer page object to interact
await page.evaluate(() => {
var actor = ((window asany).actor);
actor.pos.x =400;
actor.pos.y =400;
});
// Compare game to a new expected image
awaitexpectPage('Can move an actor and check', './images/actual-page-2.png').toBe('./images/expected-page-2.png');
});
typescript
// excalibur testing
test('An integration test', async (page) => {
// Check for the excalibur loaded page
awaitexpectLoaded();
// Compare game to expected an expected image
awaitexpectPage('Can check a page', './images/actual-page.png').toBe('./images/expected-page.png');
// Use puppeteer page object to interact
await page.evaluate(() => {
var actor = ((window asany).actor);
actor.pos.x =400;
actor.pos.y =400;
});
// Compare game to a new expected image
awaitexpectPage('Can move an actor and check', './images/actual-page-2.png').toBe('./images/expected-page-2.png');
There are some breaking changes in v0.25.0 from v0.24.5; see the changelog and release notes for more specifics, but they generally fall into the categories below. See the migration guide for guidance.
New APIs replacements
Graphics API
Actor drawing functions moved to graphics component
API renames for clarity
Bug fixed necessitated change
Extracted behavior to a plugin
Perlin noise is now offered as a plugin and is no longer included in the core library @excaliburjs/plugin-perlin
Big plugin changes
The Tiled plugin is now published under @excaliburjs/plugin-tiled and will start with version v0.25.0
This is a big release for Excalibur on our journey to 1.0.0. If you’d like to follow along, we now have a tentative roadmap available! The goal for this release was to simplify our collision infrastructure and utilities.
Thanks to our community contributors for all of their help! (see the full release notes)
Collision groups have been re-implemented to be more in line with industry practice. They allow you to determine which colliders collide with others.
Collision behavior and properties are now contained within the new type ex.Collider
Collision types are now sourced from ex.Collider
Collision groups now live on ex.Collider
Collision shapes dictate collision geometry live on ex.Collider
Collision pixel offset allows shifting of colliders by a pixel amount
Properties like mass, torque, friction, inertia, bounciness are now all part of ex.Collider instead of ex.Body
Decoupling Actor from the collision system
ex.CollisionPair now works on a pair of Colliders instead of a pair of Actors to represent a potential collision
ex.CollisionContact now works on a pair of Colliders instead of a pair of Actors to represent an actual collision
New helpful methods for colliders
Find the closest line between 2 colliders or shapes
ex.Actor.within now works based on the surface of the geometry, not the center of the object
Actions moveBy, rotateBy, and scaleBy have been changed to move an actor relative to the current position
This change makes implementing patrolling behavior moving 400 pixels left and right forever as easy as: actor.actions.moveBy(-400, 0, 50).moveBy(400, 0, 50).repeatForever();
Many name refactorings and deprecations to improve usability (see the full release notes)
We had the fortunate opportunity to get out of the city for a bit and take a vacation preceding the game jam. We wanted to take advantage of our time away from home, so we instituted regular work days (8 hours), rather than the 10-12 hour days we usually fall into the trap of doing . And surprise, it went great! Everyone was more relaxed, and we delivered a quality game in less time! It was easier for the team to focus on getting stuff done. We also managed to finish early, just ahead of the submission hour.
We did most of our work in Aseprite, with a little bit of Photoshop thrown in. A lot of the art in this game is simple shapes, and we recycled many of the backgrounds across the mini-games.
The theme was announced at 8:00 pm in our time zone. We spent the evening hours brainstorming, picking a few to develop a little more, and then deciding on our favorite choice.
We were ruthless at eliminating extras that tried to sneak in to the game. We had less time than we usually do, so we had to work efficiently. The resulting game is about half of the scope it had the potential to become, and we kept it under control.
We had to spend some extra time ahead of the jam updating our game template and tools. We could have done this at any earlier point. It wasn’t too bad, but it did cut a bit into our relaxation time for the days preceding the jam.
We also struggled again with managing state in Excalibur. We’re working on incorporating this into the Excalibur engine to improve the development process.
Overall, this Ludum Dare went great. We look forward to playing all of the cool games that we’ve seen so far for LD41!
The first commit to Excalibur.js was published on January 5th, 2013. Since then, we’ve been working to build a game engine that’s easy to develop with and fun to use. Along the way, we put together a release pipeline, constructed a test suite, wrote a lot of documentation, and created a number of extensions and samples. Here’s a quick rundown of some of the numbers:
There are some pretty big improvements coming up, and we’re looking forward to sharing those changes with you over the next year. We’re also working on a larger collection of samples and games to help new developers and showcase Excalibur’s capabilities. For a more detailed look, check out the roadmap.
We want to extend our sincere thanks to everyone who has written code, opened an issue, posted in our forum, or made a game and let us know about it. This is a very fulfilling project, and seeing others contribute to and use Excalibur means a lot to us. Thanks for your support!
In the few days before Ludum Dare, we made sure everything was ready. We set up version control, automatic deploys, and scripted tasks to help us build and develop the game. We ran into some problems during this setup, which is exactly why we do this early. These steps have become necessary for us before every game jam.
The theme was announced at 8:00 P.M. our time, and we spent the entire rest of the evening brainstorming. We made sure not to settle on anything too quickly, and came up with as many ideas as possible. From those fifty or so possibilities we picked a handful that seemed interesting enough to build. An hour or two later, we’d thrown all but one of those out, and settled on “avoid talking to people someplace – grocery store”.
We built the first version of the game level on a dry erase board. This let us iterate on how a player would traverse it, as well as devise methods for pathfinding and item generation. Every time we’ve taken the time to do this step, we saved ourselves a load of heartache. Clearing up design issues is much simpler before the code has been written.
We had three team members working on art at different points in the weekend. We built the level, the characters, and the food items from scratch. It can be difficult to maintain a visual consistency when multiple people are drawing things; we mitigated a portion of this by standardizing on the “x11” palette built in to Aseprite, so at least all of our colors matched.
We didn’t make our own music this time, but we did design most of the sound effects using littleBits and a guitar. We feel like we did a good job of unifying the soundscape and setting a cohesive mood with the audio.
One of the most useful things we do is enforce the restriction of building a “playable” game as soon as possible. It doesn’t need any fancy extras, it just needs to let the player interact with and experience it. We managed to get to that point by Sunday morning, which left us two full days to add all those cool extras. It also allowed us to play the game a lot and polish the rough edges.
We started our game with a Yeoman template we built to structure the basics for us. We also reused a number of code snippets that we had left over from other games, including animation code and player input logic. Every little bit of time we saved helped us build this game better than we could have otherwise.
We hardly encountered any actual bugs in Excalibur this time around. We did put together a long list of potential improvements, though, and look forward to incorporating those into the engine.
If you’re making a tile or grid-based game, Tiled is a great editor to build your levels in. We used it to define zones for our different grocery items to spawn in, as well as waypoints to define the shoppers’ movements.
We’ve tracked analytics in our games before, but we wanted a little more granularity this time. We configured custom analytics with Azure functions, and were able to track whatever game properties we wanted.
We ended each day after about 10:00 P.M. Ending early meant we could start early, and sleep is the best medicine for tired minds. We also cooked several meals instead of just getting fast food all the time. These two things were marked improvements from previous game jams.
We experienced a small complication with our custom Tiled plugin, due to a versioning issue with Excalibur. It wasn’t too difficult to fix, but it did slow us down a bit.
While the bug count this jam was low, it still wasn’t zero. One day, perhaps, but not this time. If anything, it’s better we run into these things before other users do, in order to prevent frustration with the development experience.
It was a bit difficult to get exactly what we were looking for in so short a time span. We managed to achieve most of the desired results, but there are still a few rough edges. We’ll be looking at adding pathfinding support directly into Excalibur in the future.
Every time we do a restrospective, the “what went well” section takes more and more space away from the “what didn’t go so well” section. It’s really encouraging to see this become a more interesting and rewarding process as we make new games. Ludum Dare was a lot of fun, and we hope to participate again someday.
We now have a utility from which Excalibur will provide useful statistics to help you debug your game. For now the stats are focused on Actors and specific frames; look for more helpful stats in future releases!
PhantomJS testing structure
Behind the scenes, we have new testing tools that will allow us to visually test complicated interactions on the canvas.
There were quite a few commits from the Excalibur community in this release. Thanks to FerociousQuasar and hogart for your contributions, and check out the full release notes for all of the details for this release.
We’ve implemented a rigid-body physics system, complete with edges, circles, and convex polygon primitives. This enables you to build fully-featured physics games in Excalibur! Fear not, the old physics system is still around for you to use.
We have improved our contributing document to make it easier to jump into Excalibur development. If you’re interested in helping out, read through our new Contributing documentation
Overall there were over 27 issues addressed in this release. Check out the full release notes for all of the details, including bug fixes and enhancements.
We’ve continued to refine and improve the way we build games for jams. It’s important that everything “just works” as much as possible. We maintained the same continuous deployment process that we’ve used before to push to a live site, so it could be tested and played within a minute of being checked in. We also used a watch-and-compile task in Visual Studio Code to gain the same benefit while developing locally.
We had four people putting together art assets on and off throughout the weekend, and it turned out great. We used bfxr to create the sound effects, and a set of littleBits components to compose the background music. Once we had settled on the theming for the game, everything fell into place.
We initially had a grand plan for introducing elements of Hexshaper, and as usual we had to set that aside and come up with a more practical solution that could be completed in the time remaining. We ended up pausing the game and moving the camera over to each portal as it opened and as the player successfully closed it, which ended up providing most of what we wanted.
We only encountered a few bugs in Excalibur this time around, and they were all relatively straightforward to test and fix. It feels better to use the engine each time we do a game jam.
We didn’t have a very clear vision of what we wanted the game to be this time around. Uncertainty translated into not really having a playable game until Monday. This delay was a stark departure from the last couple of games we’ve made, where we made a point to have something relatively complete by Saturday evening so we could iterate on it through the rest of the weekend.
There were a number of things that made interacting with the Excalibur animations API painful. Luckily, we didn’t lose too much time to them, and we now have an opportunity to improve that experience for future users.
The Excalibur docs are now cleaner and easier to navigate. Use the search bar at the top to help you find what you’re looking for.
There are also a number of improvements and bug fixes to make Excalibur faster and easier to use. If you’re so inclined, check out the full release notes.
Releases are also available in Bower and NuGet; please reference the installation guide for more information. If you’re brand new, welcome! Check out the Getting Started guide to start working with Excalibur.
The main Excalibur branch is constantly being improved by the team. If you crave living on the edge, reference the edge documentation to keep up with what we’re working on. It is automatically updated with every commit.
If you’ve used Excalibur for a project, please send it our way so we can consider showcasing it on the website!
This game jam was the second Ludum Dare we've participated in. Our goal with Sweep Stacks was to build something fun and see how well we could work with a larger team (five people instead of the usual three).
Given the problems we had last time with setup, we made sure that everyone prepared their development environments ahead of time, and brought over their computer equipment to set it up the day before. We also configured continuous deployment for our code using TravisCI and GitHub Pages. This ensured that every time we pushed a change to the game, it would update on the website and we could see that the game was working properly.
We came up with a number of ideas for this jam, several of which everyone seemed to enjoy. Even after we had those concepts moderately well-formed, we kept trying to come up with more ideas. After we’d exhausted our collective creative capacities, we made sure everyone was on the same page and went forward with the idea we all liked the most. We used Trello for new ideas or issues that we encountered; it was incredibly helpful to organize everything, and we highly recommend it for game jams.
We made a concerted effort to keep the scope of this game small. The theme definitely helped with that as well. Once we had the initial mechanics drafted for matching and piece movement, we realized that we could actually do a physical prototype. We pulled out some poker chips and a checkers board, and played the game for a while. This was immensely helpful for quickly visualizing exactly how the game would work, and allowed us to check for potential problems without having to write any code. By keeping the scope small, the game was playable very early on in development, which allowed us a lot of time to tune the gameplay.
One of our team members, Sean, offered himself up to be our dedicated game tester for the weekend, and it was absolutely phenomenal how much it helped the development process. Coupling this with our continuous deployment meant that we encountered bugs or potential issues very quickly, and could either remedy or improve upon them easily. We also made a number of features easily configurable so we could test different board sizes, block distributions, and other changes.
Another team member, Alan, brought over his guitar, so we decided to try and use it for sound effects and music. After about an hour or so, we had the music and notes that you can hear in the game. They turned out great, and really added a lot to the atmosphere we were trying to create.
Earlier on during the weekend, we had tossed around the idea of a fantasy theme for the game. In the end, we decided on a simpler art style, which ended up looking really good, and helped us focus a bit more on the gameplay rather than on designing or incorporating more complicated assets.
We recorded timelapses on our computers while we worked, and also had a camera running on the room we were all working in. It was fun going back through the pictures and watching the game develop. We’re putting together a video or two of the process, but here’s a short teaser for now:
We used Google Analytics to keep track of scores and a few other stats. However, due to a limit on how many events you can send (one event per second after the first ten events), we can’t properly record all of the events if a user plays more than one game. Next time we’ll try a different analytics provider, or consider our own solution.
Github Pages went down for some unplanned maintenance a few days after Ludum Dare was over. We didn’t have a fallback hosting solution set up, which meant that there was a fair amount of time where people simply couldn’t play the game. We now have an alert set up for our current hosting and a fallback site on Microsoft Azure ready to deploy if anything goes wrong.
Excalibur was much more stable this time around, although we did encounter a few platform-specific issues for iOS and Windows Phone that we could have been aware of sooner if we’d playtested the game on those devices.
Our final color palette ended up being very unfriendly towards color blind players. We’re currently working on different color selections for color blind modes, and we are definitely going to consider accessibility in our initial design decisions from now on.
There has been a fair amount of interest in Sweep Stacks so far, and we've definitely had a lot of fun working on it, so we plan on continuing to develop and improve it further. You can play the most recent stable version of the game at playsweepstacks.com.
Overall, our team worked really well together, given that this was our first “high-stakes” deadlined project. Being able to work in the same physical space was a big part of our productivity over the weekend, and we were able to help each other with problems or changes quickly and effectively.
We felt it was important to spend an appropriate amount of time discussing ideas before we settled on making anything. This turned out to be several hours. We took a walk around the neighborhood and brainstormed ideas that would fit within the theme, eventually settling on a much more elaborate version of what would become our game.
While Ludum Dare takes place within a limited time frame, we had no intention of staying awake for the entire duration. Overwork and sleep deprivation leads to inefficiency. We also made sure that we remembered to eat food at regular, human intervals. This helped maintain a positive mood and keep us from consuming each other and/or the neighbors.
We decided to use Tiled to create our map. We spent a bit of time getting it to integrate with Excalibur, but being able to graphically edit everything in the level on the fly was definitely worth it.
Overall, our art process went better than expected. We leveraged an existing tileset for our geography and map background. We put together the ship and kraken sprites ourselves with Photoshop and Paint.net, and they turned out well with relatively few frames of animation. We used color blending to darken up the map, which really helped set the mood of the game. The ship spotlights were created using a radial gradient effect, which was pretty simple to do and looked great. Additionally, we added a little bit of camera shake into the game when the kraken attacks ships. This was easily the best payoff for the least amount of code.
The end-game score screen was a last-minute alternative to a boss fight that we cut from our scope. It ended up adding a good deal of replay value to the game, and encouraged players to come back and try to beat their previous score. We also hooked the game up to Google Analytics, which we think everyone should look into doing if they can. It helped give some insight into how people were playing the game, as well as give us an idea of how difficult the level was.
If you’re developing a game using JavaScript, we recommend giving Typescript a try. Static typing really helped us during the rapid game-building process of Ludum Dare.
One of the main goals we had in mind for this jam was to put our game engine through its paces. We were able to push the limits of Excalibur and find a number of opportunities for improvement. The more we do game jams like this, the more filled-out the engine should become.
On the same hand, we encountered several critical issues that halted game development for several hours each. Excalibur, still in early alpha, didn’t fully support a lot of the features we tried to use it for. While this was expected, we spent a lot of time fixing bugs and adding features to the engine instead of working on the game. Next time, we plan on prioritizing quick workarounds when we’re in a time crunch.
We often didn't stick to our self-imposed deadlines. For example, we had planned on halting development several hours before the submission time, but we ended up working until fifteen minutes prior to the end of the jam. In the future, we definitely need to timebox better and set more realistic goals around task completion.
As a result of ignoring all of our deadlines, we hardly did any playtesting of the full level. While this luckily wasn’t a huge issue in the end, it had the potential to be absolutely disastrous.
The game ended up with slightly unintuitive player controls. The kraken followed the player’s mouse pointer, but we required you to press the spacebar to attack; we should have just used mouse clicks for attacking the ships. We also only played the attacking animation when the kraken was within range of a ship; while this contextual logic was a cool idea initially, it ended up being confusing for players. In addition, the kraken would spin wildly on occasion when attacking ships, which we affectionately referred to as “Spinning Squid Syndrome”. While this rotation was somewhat intentional (it was a workaround to avoid doing a lot more sprite animation), it definitely needed some fine tuning.
Another surprise for us was that many of the players we talked to were much more interested in sneaking around the ships than attacking them. We didn’t really reward this in the ending score screen, as we had always assumed everyone would want to attack the ships.
We encountered a problem with deploying the game to Github Pages. With very little time left until submission, we all vaguely thought we were doomed. Luckily, we were able to deploy straight from Visual Studio with Azure publishing, which allowed us to move forward!
We had never really used Tiled before, and while it was definitely helpful, it took some getting used to. Next time, we’ll use all of our development tools beforehand to gain some familiarity with them.
In the same vein, we should have tested the entire development process on a small scale, end to end. We could have set up the code repository, ran through a sample game to test the workflow, and deployed it to make sure the entire pipeline worked before the jam started.
While discovering issues with our game engine is an important goal for us, it shouldn’t get in the way of finishing the game. The next time we encounter a show-stopping engine bug, we’ll consider changing the mechanics or creating a simple workaround rather than dropping everything to fix it. For example, we spent hours smoothing ship rotations, when we could have just had them snap to their new travel direction.
While we did a pretty good job of cutting features and scope from the project as we went along, it would have been better to cut those things earlier; there were several things (boss battles, different enemy types, etc.) that we still planned on implementing even when we didn’t really have any time to do so.
We plan on adding even more stats and analytics from now on. We could have kept track of player pathing information to see if there were any problems with the level design, or gotten more insight into the play style choices that everyone was making.
We have been working a little bit in our free time to clean up the game code and add more features. It would be really cool to add more of our original scope back into the game now that we’re not under any time constraints. You can take a look at the latest branch of the repository to see how we’re doing.

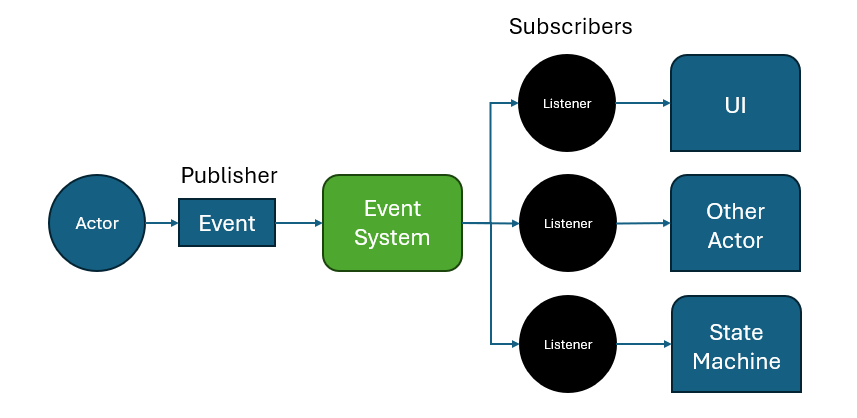
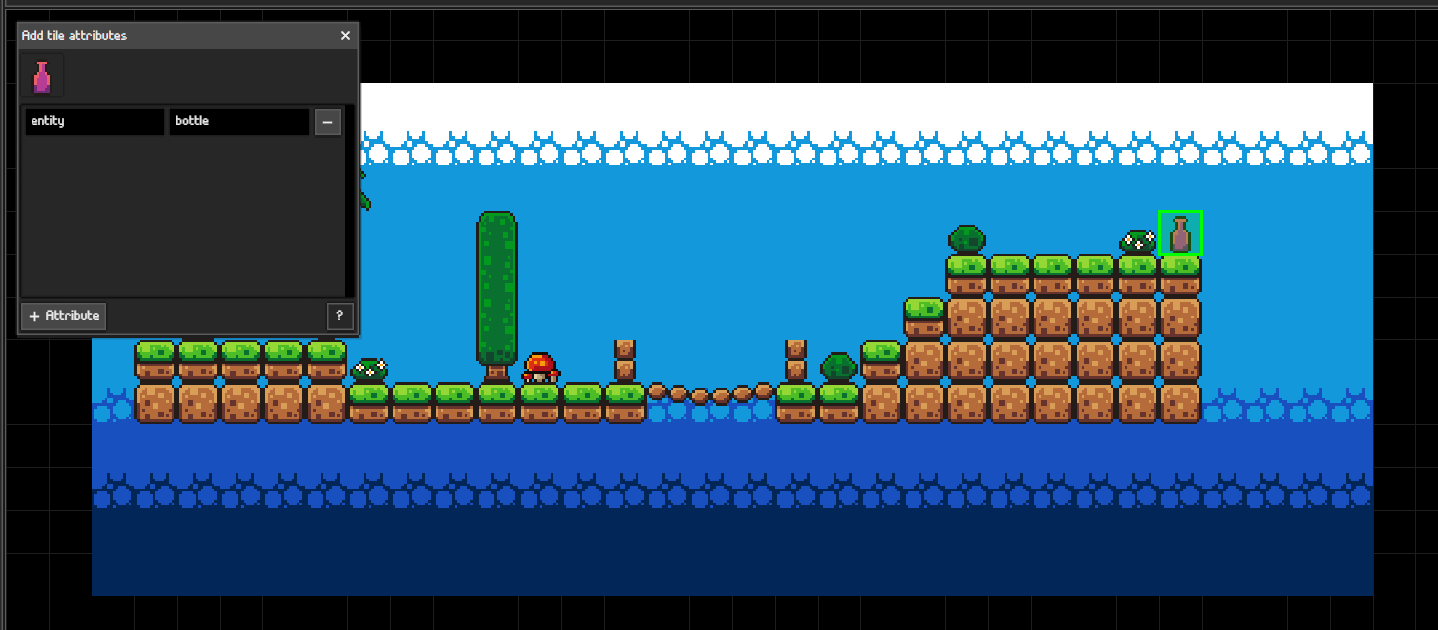

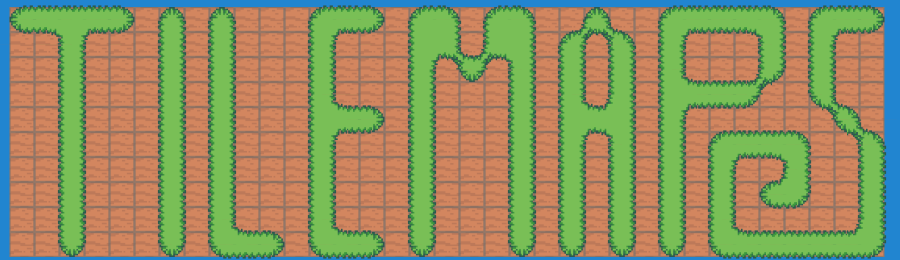
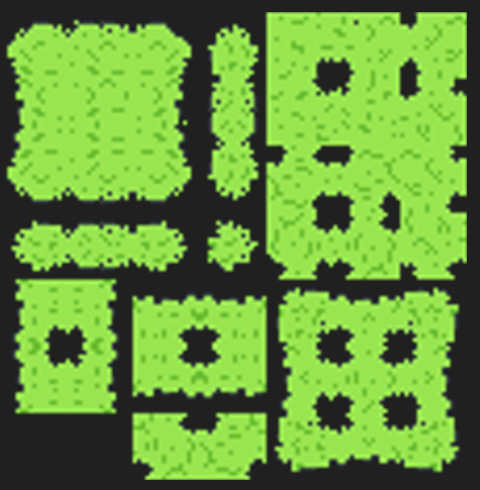
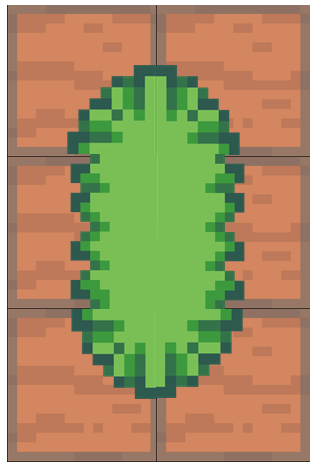
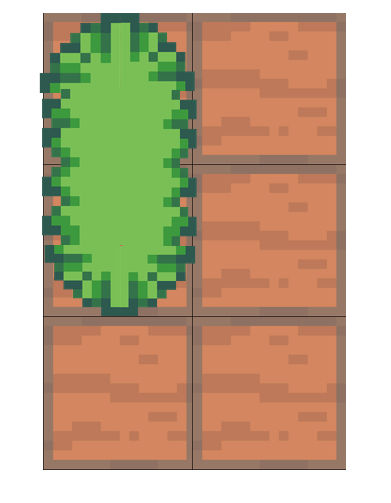


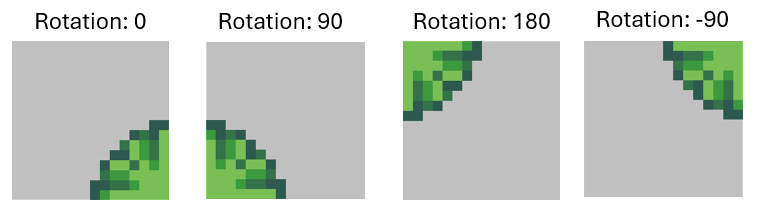


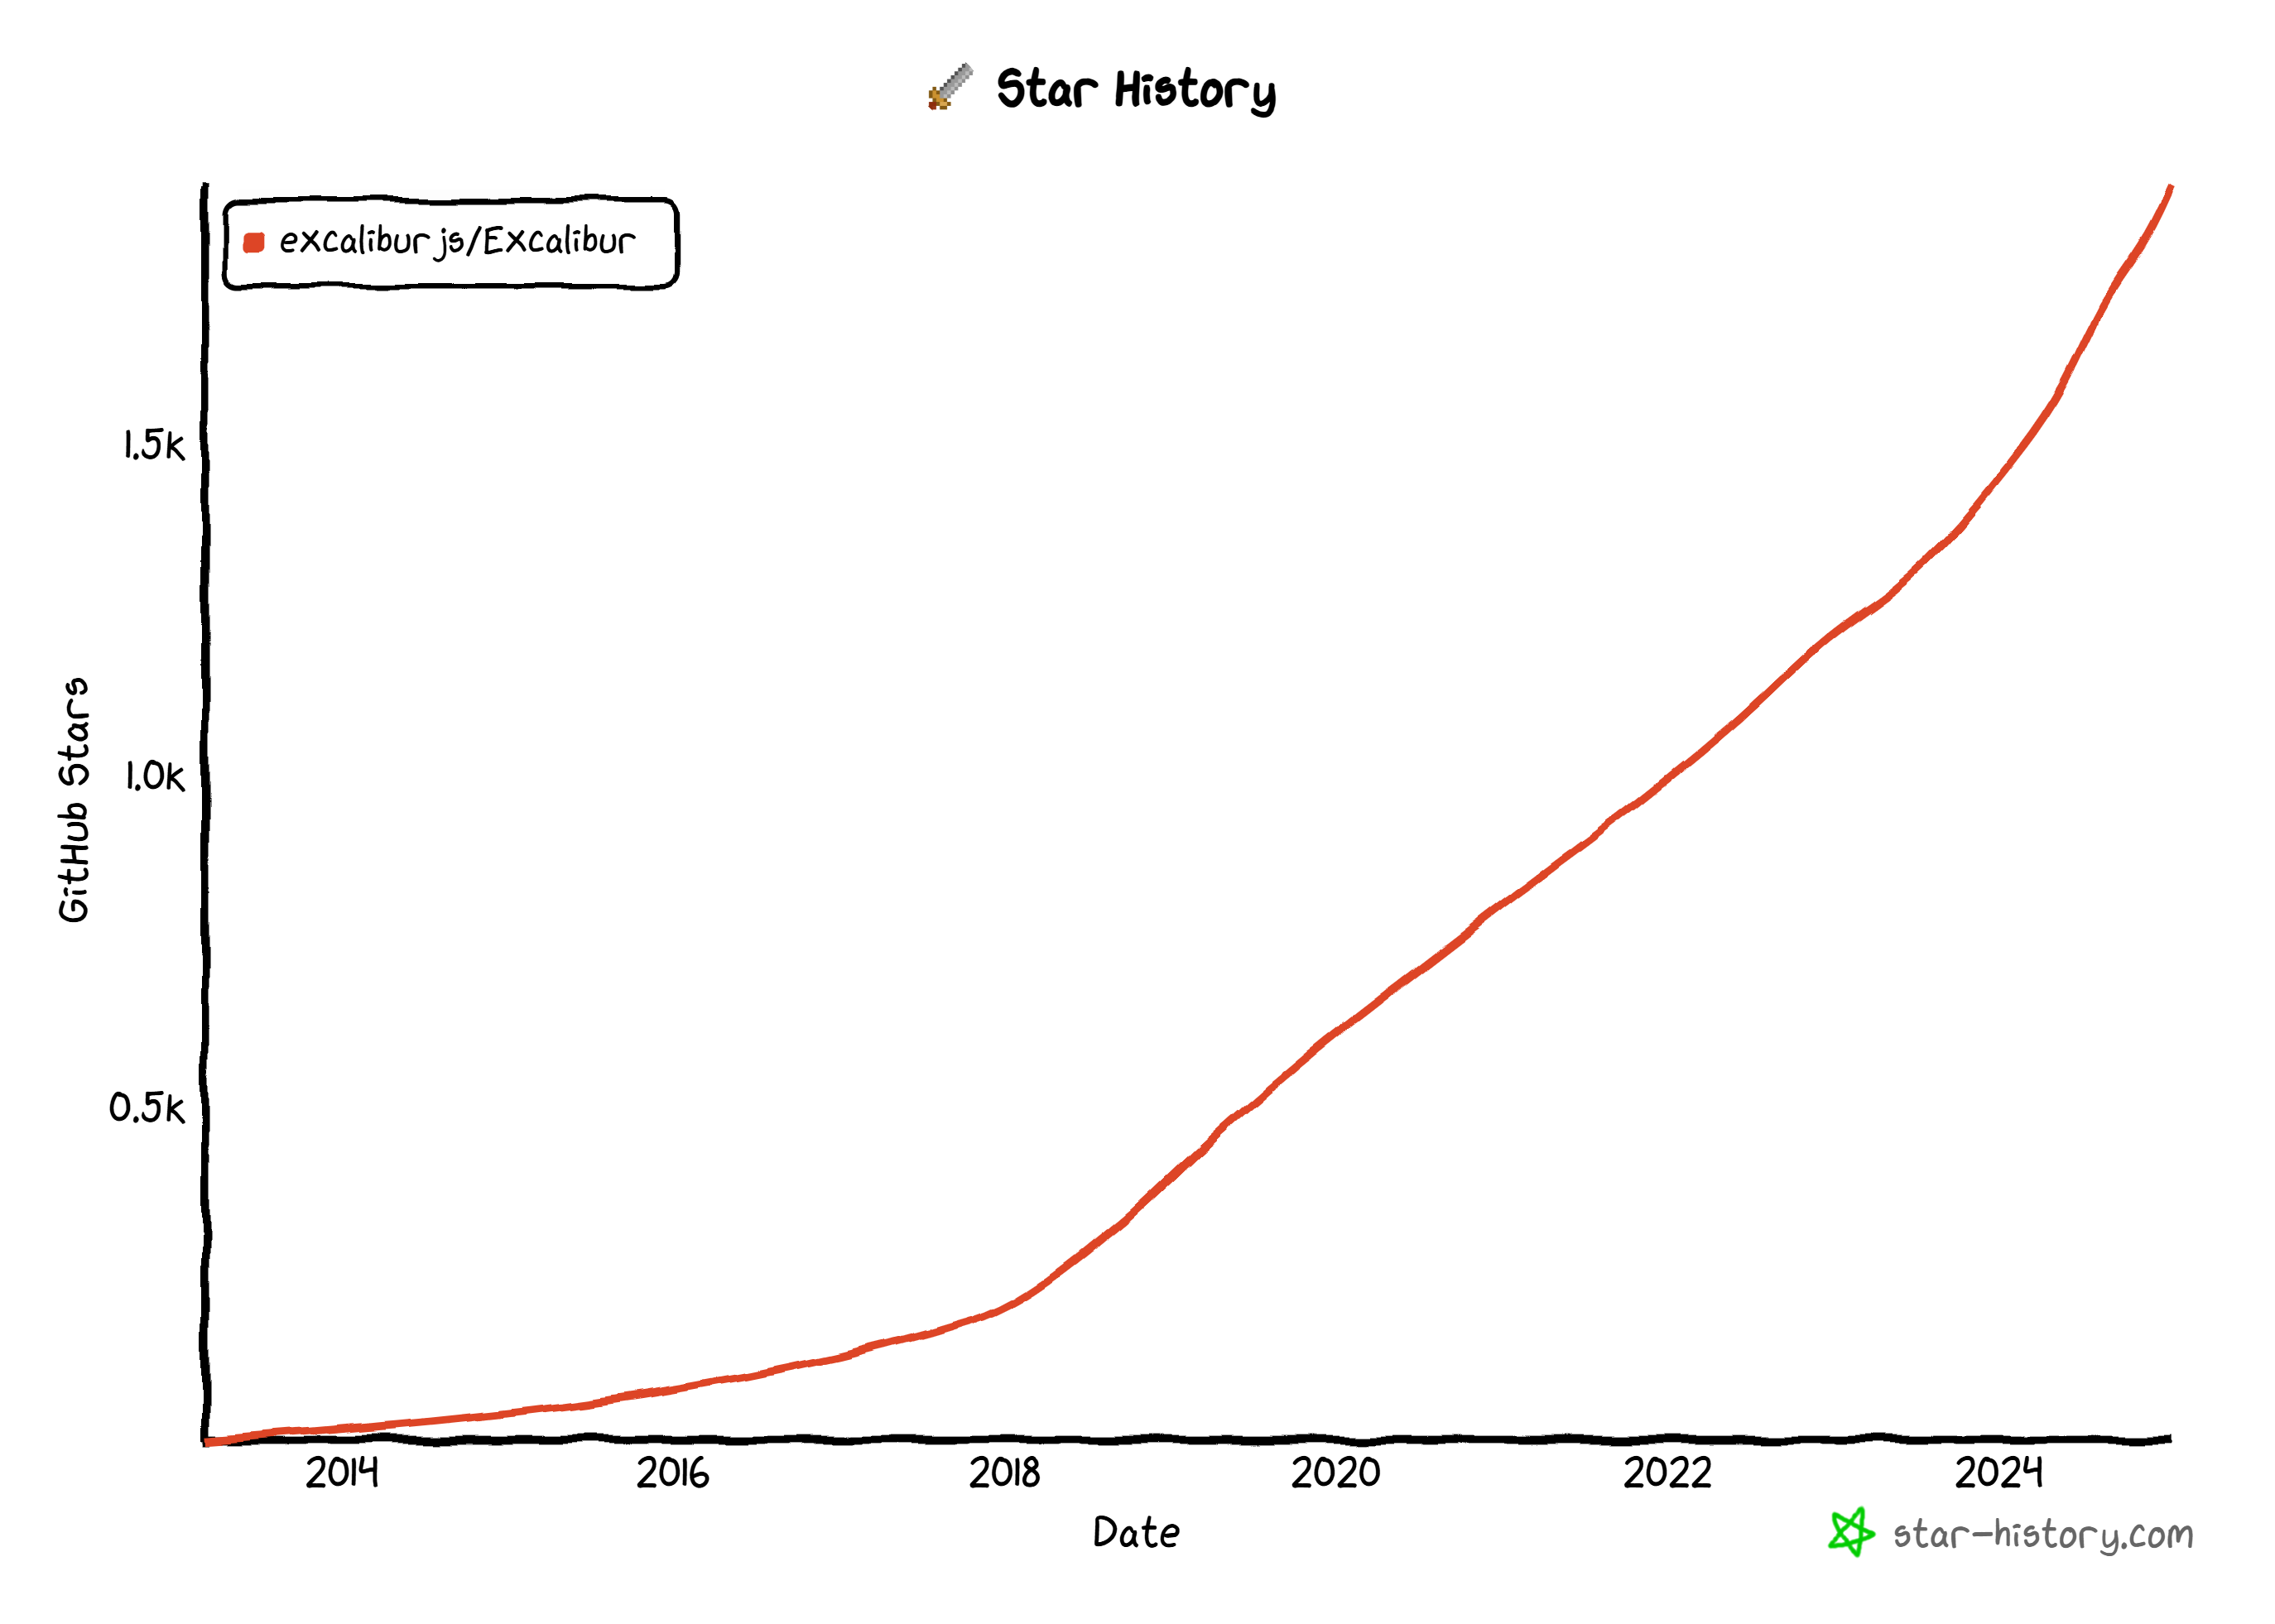

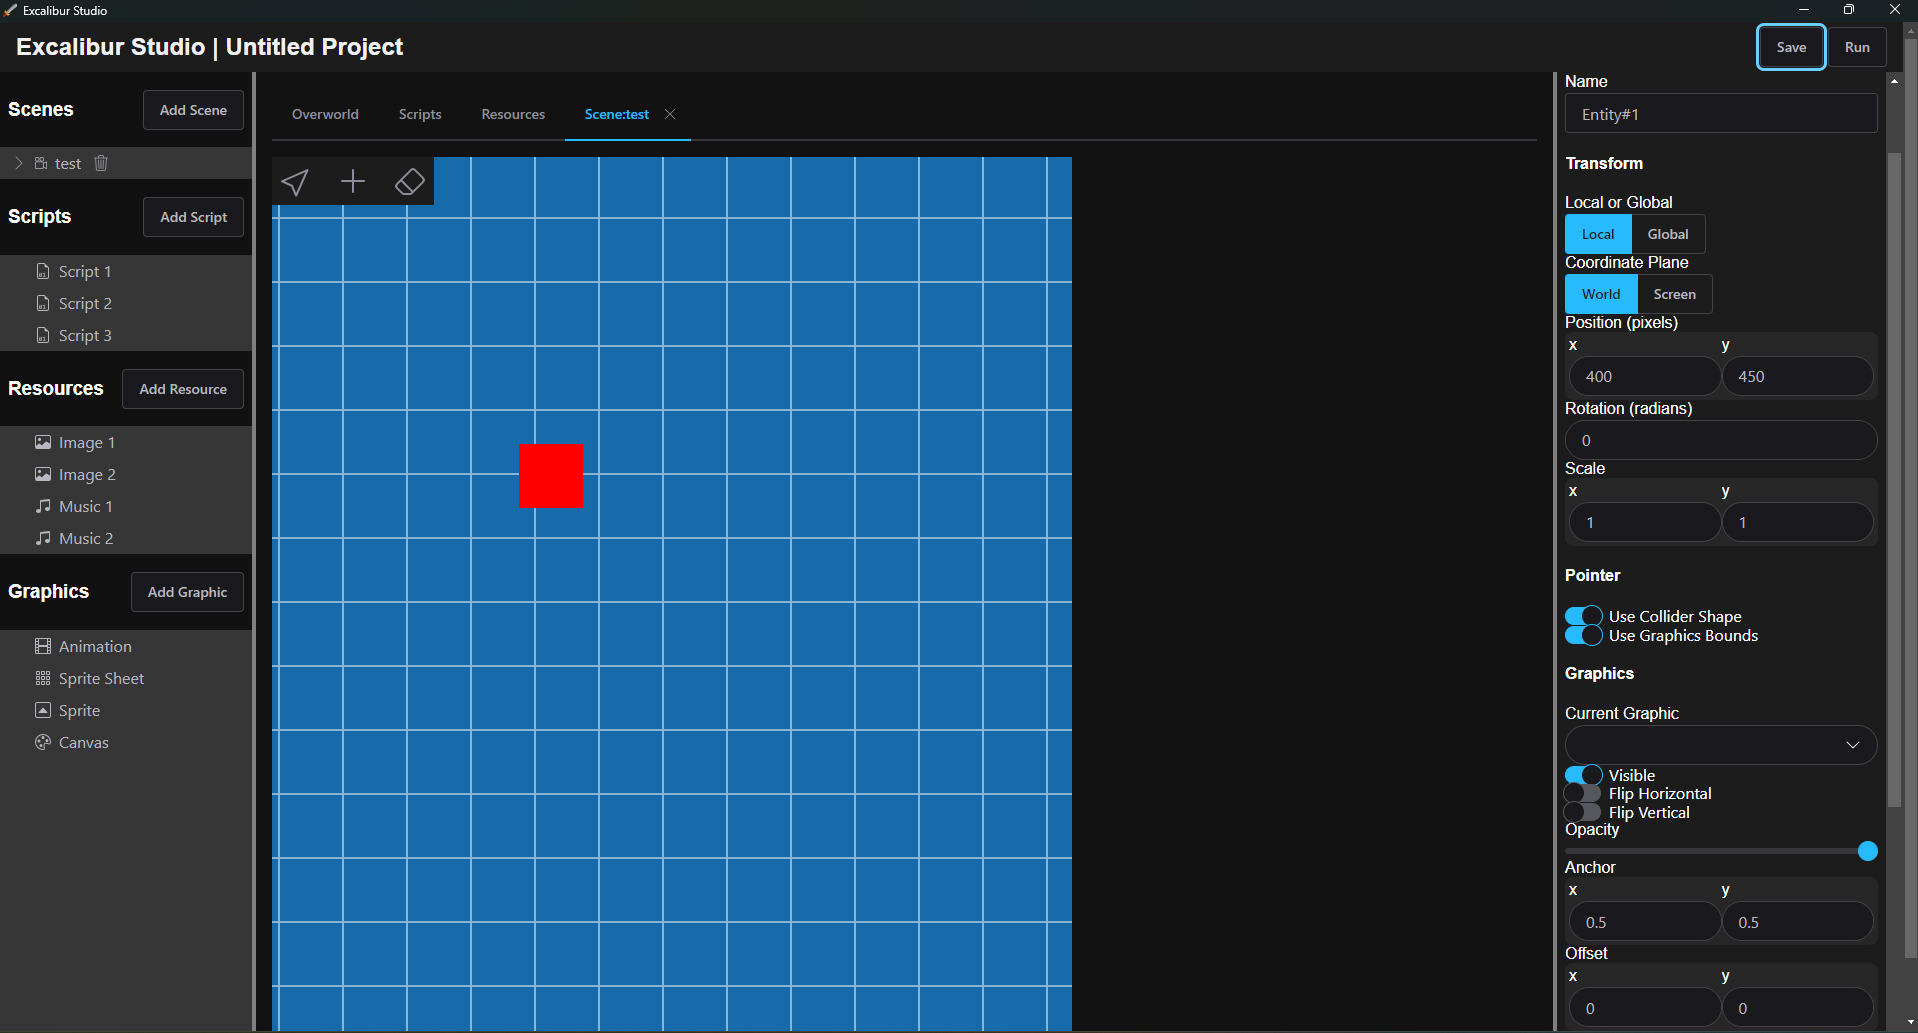


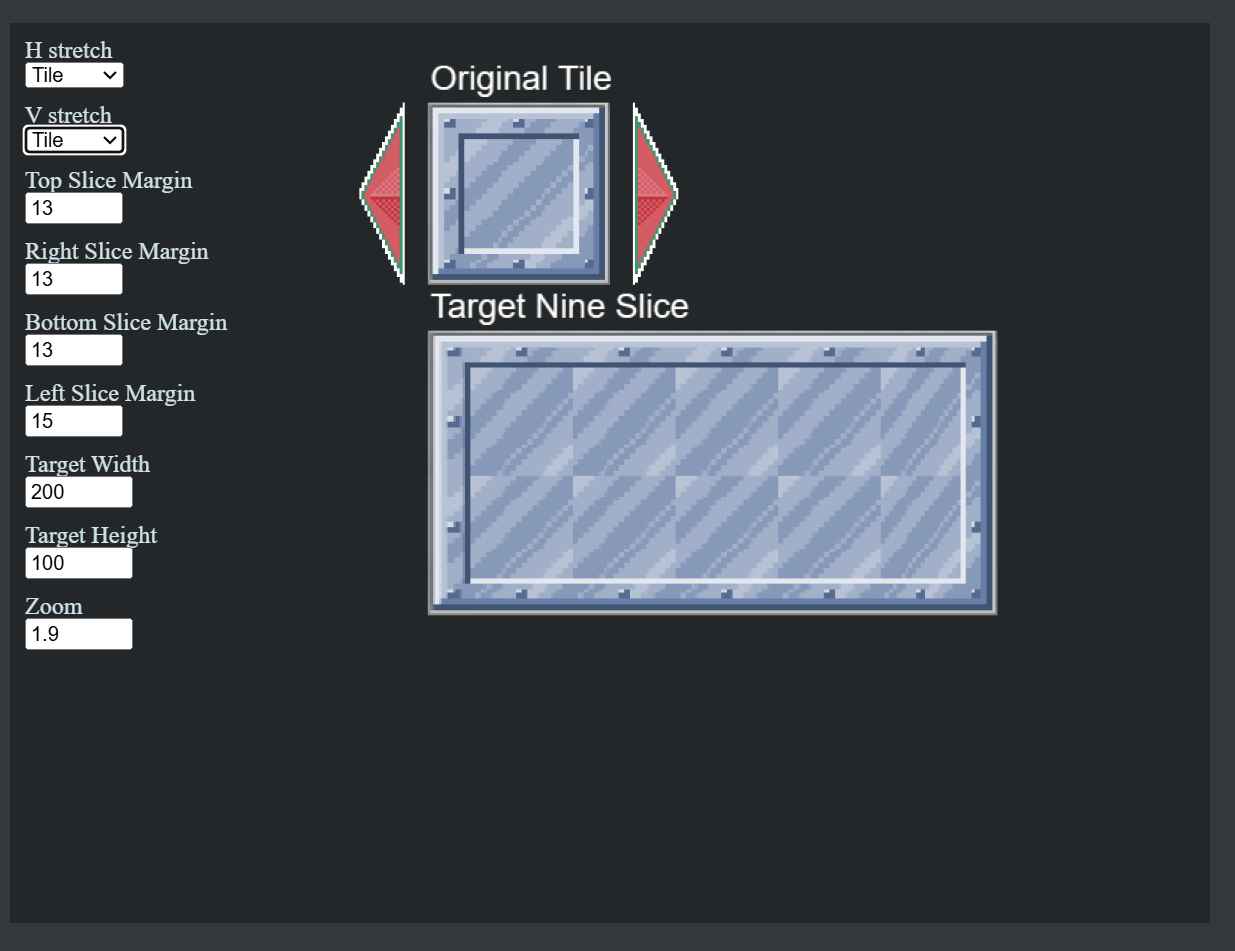

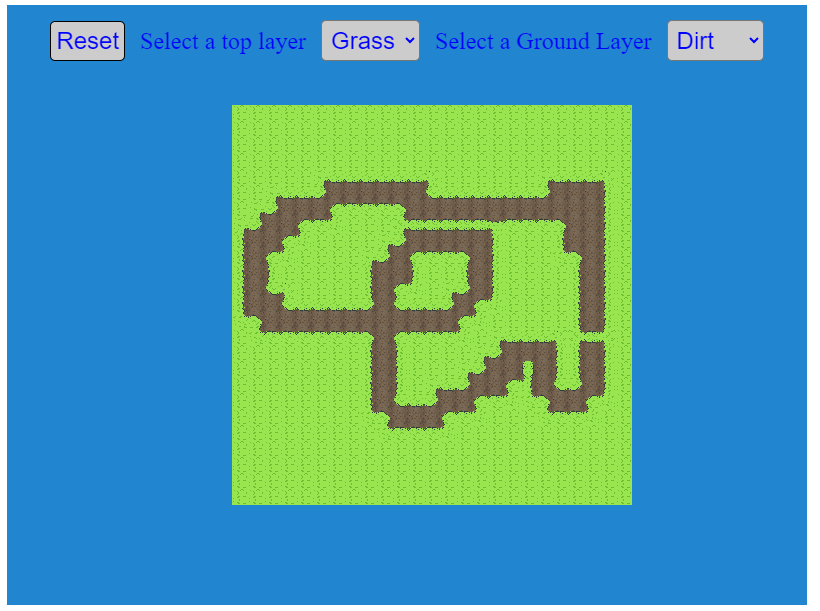
 and a dirt path tile


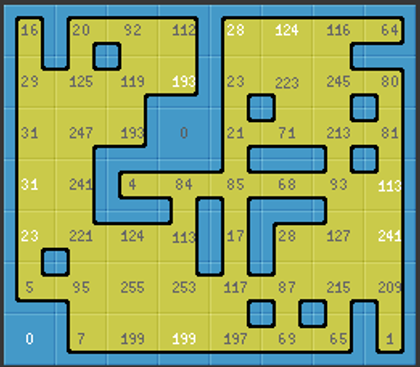
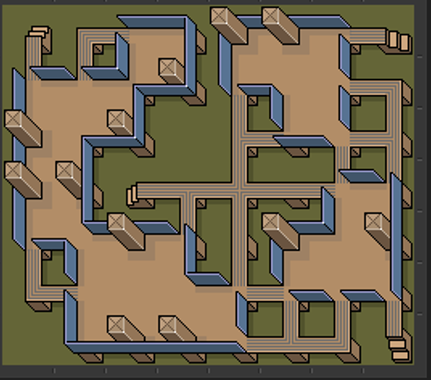
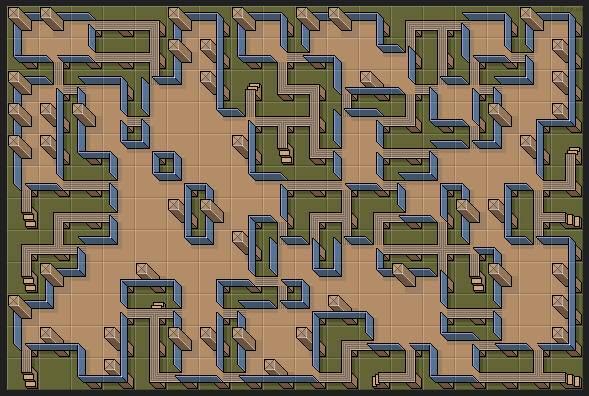


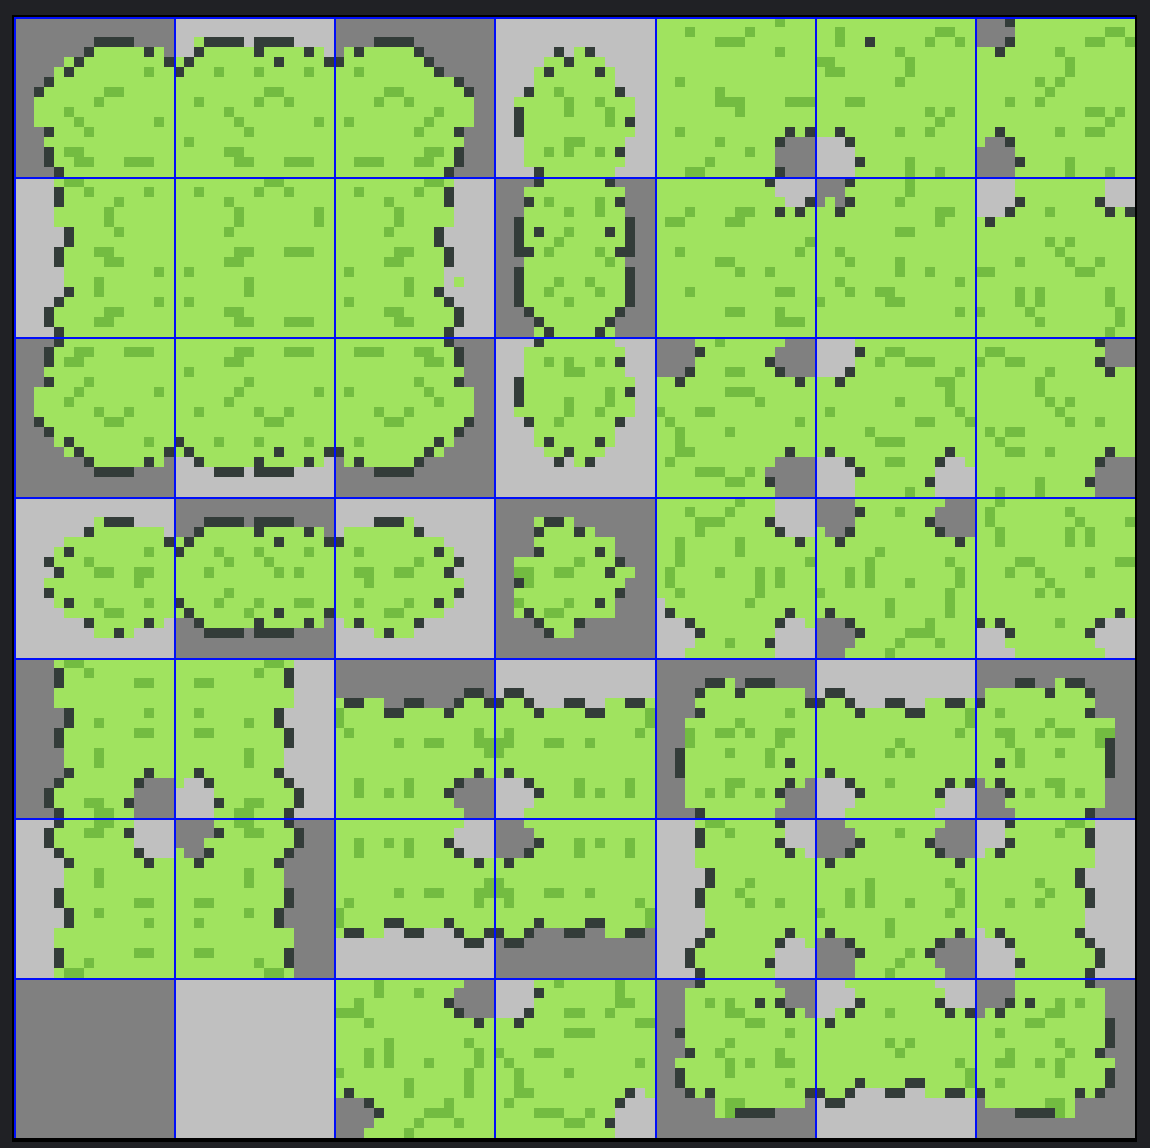

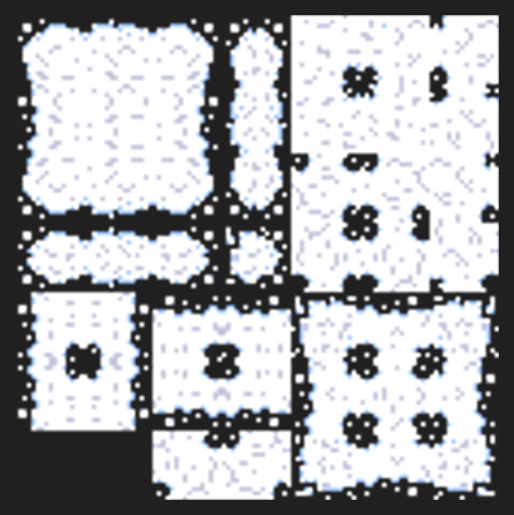
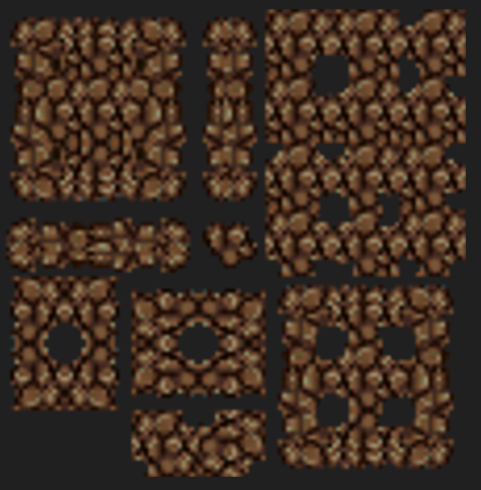

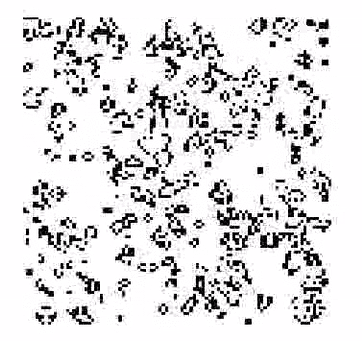

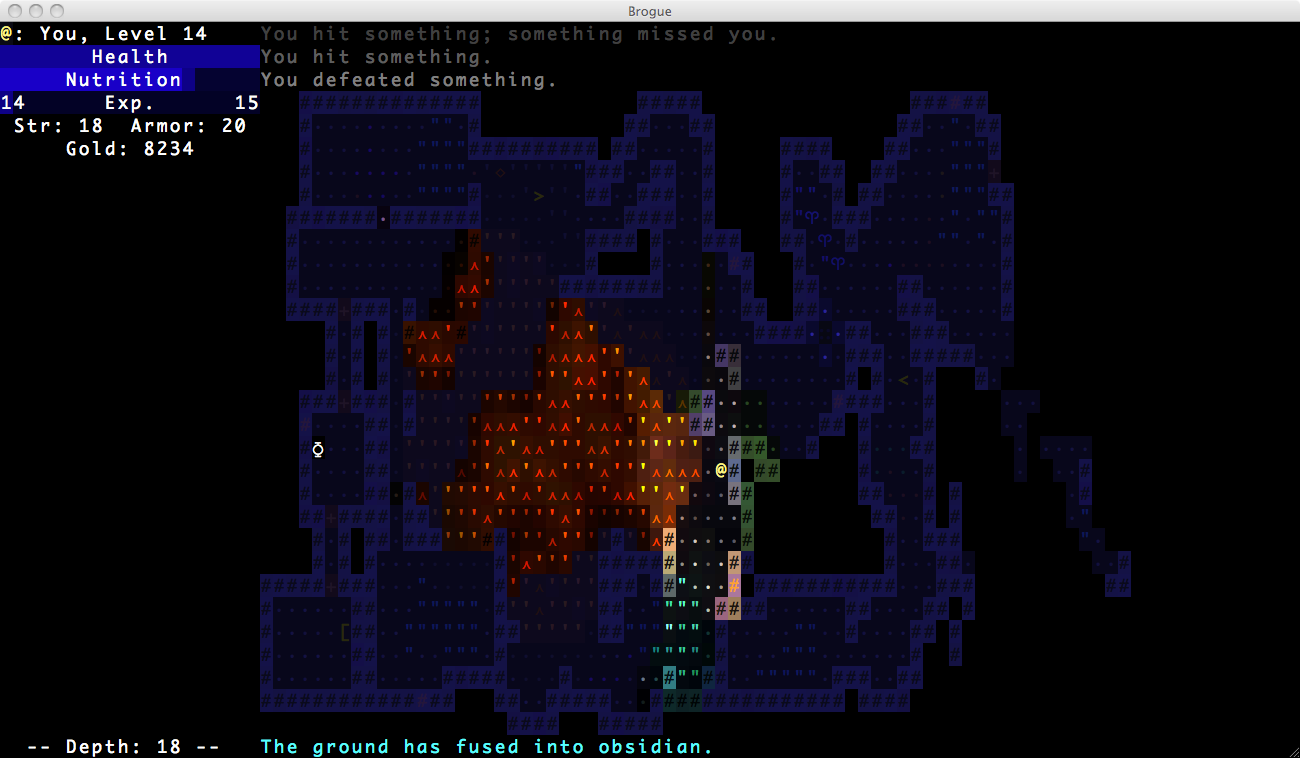


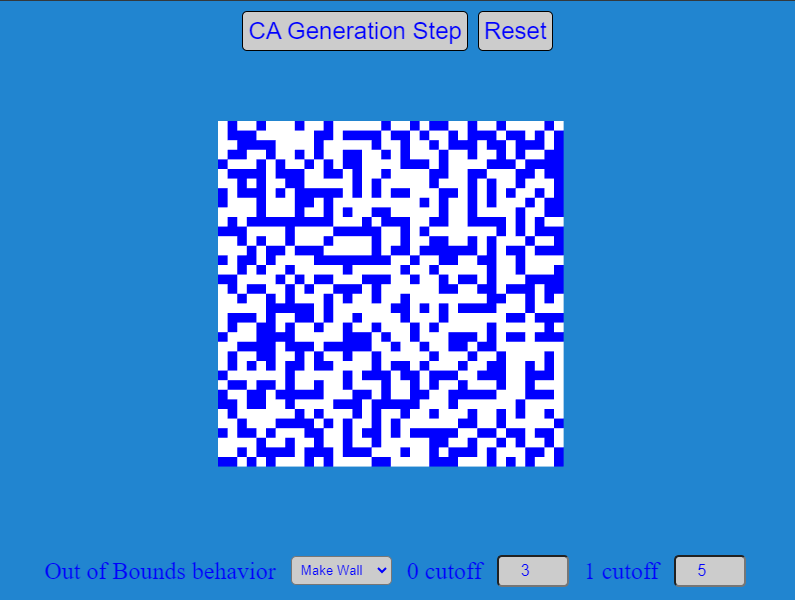
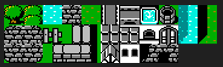 (Yes I do have an unhealthy fascination with the original Final Fantasy)