Isometric TileMaps
Excalibur can produce isometric style tile maps! Isometric tilemaps, also known as 2.5D, provide a way to draw maps from a simulated 45 degree camera view.
Excalibur has a Tiled plugin to automatically create tilemaps from isometric maps created in the popular Tiled editor. We generally recommend using the plugin, however, read on to understand how isometric tilemaps function in Excalibur.
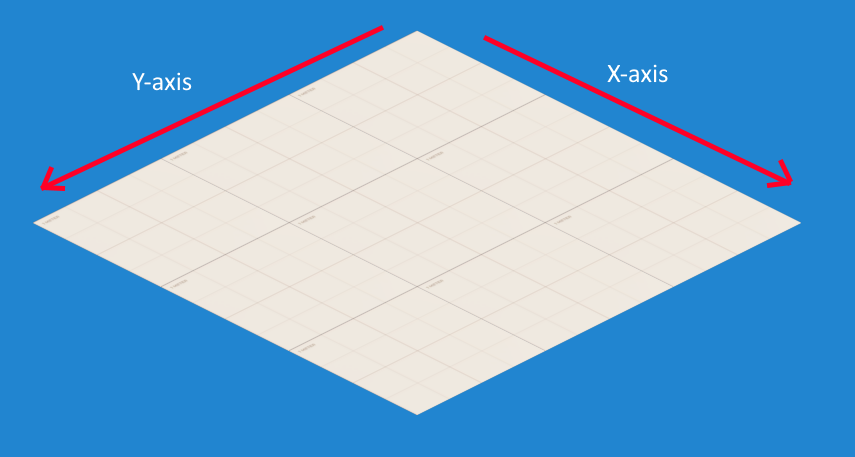
In Excalibur the x-axis moves down the top right edge, and the y-axis moves down the top left edge.
Isometric Map Usage
Use the Excalibur IsometricMap class for drawing isometric grids! (They also support custom colliders via the same mechanism as ex.TileMap
)
typescript
const game = new ex.Engine({...});const isoMap = new ex.IsometricMap({pos: ex.vec(250, 10),tileWidth: 32,tileHeight: 16,columns: 5,rows: 5});game.currentScene.add(isoMap);
typescript
const game = new ex.Engine({...});const isoMap = new ex.IsometricMap({pos: ex.vec(250, 10),tileWidth: 32,tileHeight: 16,columns: 5,rows: 5});game.currentScene.add(isoMap);
The tilemap is composed of IsometricTile's which are Entities with a IsometricEntityComponent. The IsometricEntityComponent can be applied to any entity that needs to be correctly sorted in the drawing order to preserve the isometric illusion, this is useful if you have players or game objects that move around the map.
The IsometricEntitySystem generates a new z-index based on the elevation
and TransformComponent of an entity with IsometricEntityComponent.
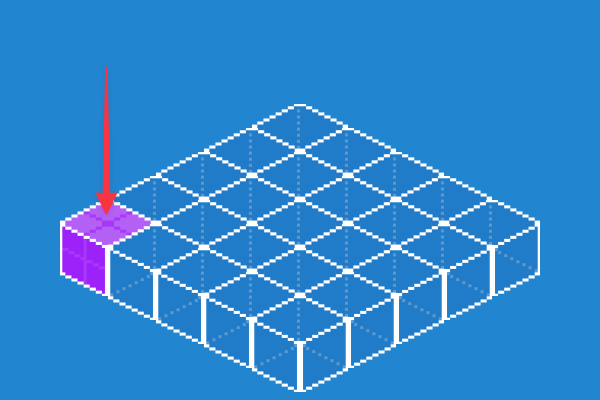
The 5x5 IsometricMap map from the above example snippet will contain 25 IsometricTile
's. These are accessible via the tiles
property on the IsometricMap
instance. e.g. isoMap.tiles
. The IsometricMap represents a single layer in an isometric scene.
At this stage the IsometricTile
's do not have graphics attached, so they are invisible to the human eye. But the IsometricMap
that has been added to the scene can be thought of as:
Selecting an appropriate Tile Height
When defining the tileHeight
there are a few considerations you should make relative to your asset. Usually the tileHeight
is half your graphics total height. With other art assets the tileHeight
can be different, in this case roughly half the height of the asset. This height will depend on your art assets.
Converting Coordinates to Tile Coordinates
World space coordinates can be converted to the tile x/y coordinate
typescript
const isoMap = new ex.IsometricMap({...});let tileCoord = ex.vec(0, 0);game.input.pointers.on('move', evt => {// Convert world position coordinates to tile x/ytileCoord = isoMap.worldToTile(evt.worldPos);});
typescript
const isoMap = new ex.IsometricMap({...});let tileCoord = ex.vec(0, 0);game.input.pointers.on('move', evt => {// Convert world position coordinates to tile x/ytileCoord = isoMap.worldToTile(evt.worldPos);});
You can also get the top/left world space coordinate given a tile coordinate.
typescript
const isoMap = new ex.IsometricMap({...});const tileCoord = ex.vec(0, 0);const worldSpaceCoord = isoMap.tileToWorld(tileCoord);
typescript
const isoMap = new ex.IsometricMap({...});const tileCoord = ex.vec(0, 0);const worldSpaceCoord = isoMap.tileToWorld(tileCoord);
Adding Graphics to IsometricTiles
Graphics can be added to an IsometricTile. Graphics are drawn differently from other parts of Excalibur, they are drawn from the bottom left, this is done to help preserve the illusion of placing tiles on top of a grid.
typescript
const isoMap = new ex.IsometricMap({...});const image = new ex.ImageSource('./path/to/image.png');await image.load();const sprite = image.toSprite();for (let tile of isoMap.tiles) {tile.addGraphic(sprite);}
typescript
const isoMap = new ex.IsometricMap({...});const image = new ex.ImageSource('./path/to/image.png');await image.load();const sprite = image.toSprite();for (let tile of isoMap.tiles) {tile.addGraphic(sprite);}
To switch the default behavior and render graphics from the top of a tile, add renderFromTopOfGraphic
to the constructor. This can be useful if your Isometric tiles are conceptually "flat" without any perceived height.
typescript
const isoMap = new ex.IsometricMap({...renderFromTopOfGraphic: true;});
typescript
const isoMap = new ex.IsometricMap({...renderFromTopOfGraphic: true;});
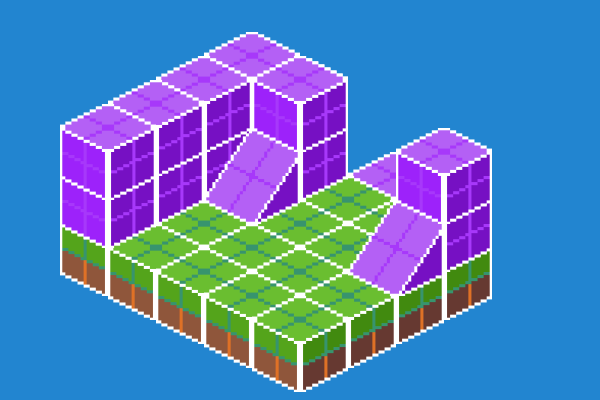
Working with depth and elevation
As noted above, an IsometricMap
represents a single layer in an isometric scene. To add some depth to a scene we can "stack" multiple IsometricMap
's, adjusting the elevation
and y
of each subsequent IsometricMap
. This will give the desired effect of tiles appearing on top of another.
For more advanced maps, with multiple layers, we recommend using the Tiled plugin which handles the complexity automatically.
typescript
export class MyLevel extends Scene {private layers = [[ // Floor[0, 0, 1, 1, 0],[3, 3, 3, 3, 3],[3, 3, 3, 3, 3],[3, 3, 3, 3, 3],[3, 3, 3, 3, 3],],[ // Wall layer 1[1, 0, 0, 0, 0],[1, 1, 0, 0, 1],[1, 2, 0, 0, 2],[1, 0, 0, 0, 0],[1, 0, 0, 0, 0],],[ // Wall layer 2[0, 0, 0, 0, 0],[1, 1, 0, 0, 1],[1, 0, 0, 0, 0],[1, 0, 0, 0, 0],[1, 0, 0, 0, 0],],];override onInitialize(): void {const image = SpriteSheet.fromImageSource({image: Resources.Tiles,grid: {rows: 3,columns: 6,spriteWidth: 32,spriteHeight: 32,},});this.layers.forEach((layer, index) => {const isoMap = new IsometricMap({pos: vec(300, 184 + index * -16),tileWidth: 32,tileHeight: 16,columns: layer.length,rows: layer[0].length,elevation: index,});this.add(isoMap);// This is a primitive approach of manually assigning a tile based// on the input data. In reality, you will probably use more// advanced techniques such as using information contained in a// Tiled map file//isoMap.tiles.forEach((tile) => {if (layer[tile.y][tile.x] === 1) {tile.addGraphic(image.getSprite(0, 0));}if (layer[tile.y][tile.x] === 2) {tile.addGraphic(image.getSprite(3, 0));}if (layer[tile.y][tile.x] === 3) {tile.addGraphic(image.getSprite(5, 0));}});});}}
Adding Colliders to IsometricTiles
Colliders can be added to tiles, colliders are positioned relative to the top left of the tile's asset bounds. You can calculate this by looking at your rectangular tile asset and counting the pixels down from the top left.
In this example the tile art asset has a width of 111 pixels and a height of 128 pixels.
IsometricTile's need to be set to solid = true
for them to act as CollisionType.Fixed
colliders.
typescript
const isoMap = new ex.IsometricMap({tileWidth: 111,tileHeight: 64, // note the tileHeight is half the asset heightcolumns: 2,rows: 2});for (let tile of isoMap.tiles) {tile.solid = true;tile.addCollider(ex.Shape.Polygon([ex.vec(0, 95), ex.vec(55, -32 + 95), ex.vec(111, 95), ex.vec(55, 32 + 95)]));}
The geometry is shown here in green and the asset graphics bounds are shown in yellow.